What's new
Honda Trail 125 Forum

Welcome to the Honda Trail 125 Forum! We are an enthusiast forum for the Trail 125, Hunter Cub, CT125 or whatever it's called in your country. Feel free to join up and help us build an information resources for this motorcycle. Register a free account today to become a member. Once signed in, you'll be able to participate on this site by adding your own topics and posts, as well as connect with other members through your own private inbox!

CHAIN ALIGNMENT TOOL

m in sc

Well-known member
Joined
Feb 2, 2021
Messages
2,499
Location
Rockhill, SC
these tools kill me. all you need is a goood tape measure and square the axle to the swingarm bolt .02
 

STUBBORN

Active member
Joined
Apr 21, 2021
Messages
219
The alignment marks on the swing arm are not equal on this motorcycle. I have a good metric tape measure.

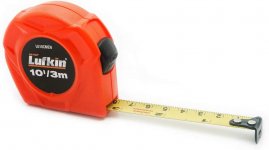
Crescent Lufkin L610CMEN 1/2" x 3m/10' Hi-Viz® Orange SAE/Metric Yellow Clad Power Return Tape Measure

lufkin tape.jpg

I could not get the rear axle aligned without this alignment tool. I am a beginner so having a second means of ensuring that the rear axle is straight that costs only $16.00 is worth it to me.
 

m in sc

Well-known member
Joined
Feb 2, 2021
Messages
2,499
Location
Rockhill, SC
I never said anything about the marks on the swingarm. .02. also, as soon as it's square once, until you replace the chain, you just turn each adjuster bolt equal amounts each time you tighten the chain.
alternative method is a caliper on the adjuster bolt to the end plate measurement.
 

STUBBORN

Active member
Joined
Apr 21, 2021
Messages
219
Of course, you always can use a laser chain alignment tool.
Amazon $115.00
profi laser cat .jpg
Advantages:
Leave your chain guard on.
No parallax or sighting issues.
Disadvantages:
Expensive, if you are not doing a lot of chain work.
The CAT controls are a bit sensitive.


SneakyDingo

Well-known member
Joined
Aug 6, 2021
Messages
1,570
Is it worth it? Well, old mechanics do it by touch, and torque wrenches exist for the rest of us wallet warrior mere mortals. It's nice to shit on someone for not being able to do it using a tape measure but you know what - $16 well spent if you suck at this particular job and this tool helps you achieve your goal of getting a good chain line.

You have the $16 Motion Pro tool.
The $11 chinese knock off.
Then there's a 3D printer model, which I already have a printer for but I'd probably model my own so I can change what size bolt I'm using to something I have already. But for that model my local overpriced Home Depot has $3.93 for the 1/4" round bar x 12", and a M10 bolt x 50mm at $2.75, plus the filament which would cost me like $1 at most... $7.70? For $7.70 that seems pretty reasonable to use a tool like that (and the 3D printer can absolutely get tolerances tight enough for this purpose). EDIT: I could probably model the bolt too and drop the price down to $5 or so.

I use a straight edge ruler right now.
 

dmonkey

Well-known member
Joined
Jul 4, 2021
Messages
2,232
Location
🇺🇸
I just measure how much the adjuster bolt sticks out with a caliper each time like @m in sc mentions. With a digital caliper it reduces the risk of human error in counting turns of a wrench, and any errors in the assumption that you're starting out with an already aligned axle.
 

m in sc

Well-known member
Joined
Feb 2, 2021
Messages
2,499
Location
Rockhill, SC
im not shitting on anybody. just commenting that a ruler/tape is all you need. you should be using one for chain slack adjustment anyway. also, something to keep in mind. 1: the front sprocket floats so what the laser is measuring against moves. 2: these bikes have rubber swingarm bushings and will and do wear over time, so the arm itself will get misaligned as these wear. measuring from the pivot assures the axle is perpendicular to the frame, which is what matters. just .02
 

Kev250R

Well-known member
Joined
May 25, 2022
Messages
576
Location
Orange So.Cal.
I'm with SneakyDingo; if owning a tool makes a novice mechanic more competent then I'm all for it. In the air-cooled VW world I know many people who set timing by ear and can get it spot-on or close enough. I use a Timing Light and feel no shame in using it.
 

m in sc

Well-known member
Joined
Feb 2, 2021
Messages
2,499
Location
Rockhill, SC
been at this a very long time as well. I still use timing lights, dial indicators, tuning carbs with an afr gauge, etc...etc.

With as much 'in-field' adjustments as is gone on about on here, learning how to do it with a tape actually makes you more competent IMHO. Like said, its about getting the rear wheel & axle aligned to the chassis. If that's aligned, the chain will also be aligned by default. I also have laser levels/pointers, never really need them... except they were handy when I built my backyard shed to verify my measurements.

Is it a bad tool? no. Is it necessary? absolutely not. Buy it or not, doesn't really matter. Just trying to give some insight here to the new guys as to what's actually trying to be accomplished by this adjustment. .02
 

mcmd

Active member
Joined
Nov 3, 2022
Messages
225
Location
SW Ohio
While we're on the subject of chain alignment, I need help. My chain needed tensioning. I watched videos to learn how to make this adjustment and followed the instructions to the letter. Namely, loosening the axel. Backing off the outermost nut on the adjuster while noting the position of the indicating notches on each side. I made the adjustment according to the proper amount of freeplay and made sure the notches were in the same position on each side of the bike. Everything seemed okay. The thing that puzzles me is that the end cap on the left side is loose and the end cap on the right side is tight. I rode the bike up and down my driveway a few times and it seemed to ride just fine. I just can't figure out why the end cap on the left is loose. I'd really appreciate some input on why this is happening and how to correct this issue. Thanks in advance and happy holidays.
 

SneakyDingo

Well-known member
Joined
Aug 6, 2021
Messages
1,570
While we're on the subject of chain alignment, I need help. My chain needed tensioning. I watched videos to learn how to make this adjustment and followed the instructions to the letter. Namely, loosening the axel. Backing off the outermost nut on the adjuster while noting the position of the indicating notches on each side. I made the adjustment according to the proper amount of freeplay and made sure the notches were in the same position on each side of the bike. Everything seemed okay. The thing that puzzles me is that the end cap on the left side is loose and the end cap on the right side is tight. I rode the bike up and down my driveway a few times and it seemed to ride just fine. I just can't figure out why the end cap on the left is loose. I'd really appreciate some input on why this is happening and how to correct this issue. Thanks in advance and happy holidays.

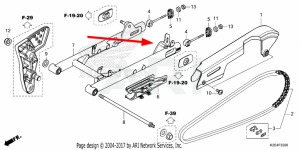
So the part of your bike that you're looking at is this:

2021-honda-trail-125-abs-swingarmchain-case_detail.png

#4 goes inside the swingarm right where the axle nut is, #5 is the end cap you're referring to as loose, #11 is the adjustment nut and #13 is the locking nut to stop it backing off on its own (#13 is tightened against #11 when you're locking everything in place).

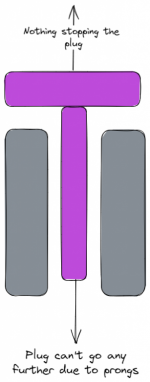
What you have here is a sort of plug situation with the end caps and #4, which looks like this:
Untitled-2022-12-24-0850.png

When you loosen the bolts on the axle that normally goes through F-19-20 (14mm and 19mm wrenches), that eases the grip on the outer plates on the swingarm. When that happens, part #4 moves freely when the axle bolts are loosened, which allows #5, #11 and #13 to all move backwards. That rattling is #5 being loose.

If you pulled the wheel all the way back and tightened the axle bolts, the chain would be insanely tight, and the end caps would hang freely, and despite having done the bolt adjustment steps right you'd actually have an out-of-spec chain tension. To resolve it, when you adjust everything, you should push the entire wheel forward on both sides. Make sure that the end cap sits nicely inside the swingarms flush with the ends. Move the wheel as far forward as you can, check everything is flush, tighten the bolts enough to hold it in place, and check the chain tension. If the tension is good, tighten the axle bolts to spec checking that nothing moves (I continue to prop the wheel forward until I'm done), and then call it good. If something moves around, loosen the 14 and 19mm bolts and start again.
 

mcmd

Active member
Joined
Nov 3, 2022
Messages
225
Location
SW Ohio
So the part of your bike that you're looking at is this:

View attachment 4564

#4 goes inside the swingarm right where the axle nut is, #5 is the end cap you're referring to as loose, #11 is the adjustment nut and #13 is the locking nut to stop it backing off on its own (#13 is tightened against #11 when you're locking everything in place).

What you have here is a sort of plug situation with the end caps and #4, which looks like this:
View attachment 4565

When you loosen the bolts on the axle that normally goes through F-19-20 (14mm and 19mm wrenches), that eases the grip on the outer plates on the swingarm. When that happens, part #4 moves freely when the axle bolts are loosened, which allows #5, #11 and #13 to all move backwards. That rattling is #5 being loose.

If you pulled the wheel all the way back and tightened the axle bolts, the chain would be insanely tight, and the end caps would hang freely, and despite having done the bolt adjustment steps right you'd actually have an out-of-spec chain tension. To resolve it, when you adjust everything, you should push the entire wheel forward on both sides. Make sure that the end cap sits nicely inside the swingarms flush with the ends. Move the wheel as far forward as you can, check everything is flush, tighten the bolts enough to hold it in place, and check the chain tension. If the tension is good, tighten the axle bolts to spec checking that nothing moves (I continue to prop the wheel forward until I'm done), and then call it good. If something moves around, loosen the 14 and 19mm bolts and start again.
Thank you for this information. Presently we're in that midwest cold wave and my garage is freezing. We're supposed to get temps in the 50's next week. I plan on giving it another go then. If I understand correctly, I should push the wheel all that way forward with the axel loosened and then make the adjustment. Is that pretty much it?
 

SneakyDingo

Well-known member
Joined
Aug 6, 2021
Messages
1,570
Thank you for this information. Presently we're in that midwest cold wave and my garage is freezing. We're supposed to get temps in the 50's next week. I plan on giving it another go then. If I understand correctly, I should push the wheel all that way forward with the axel loosened and then make the adjustment. Is that pretty much it?
Yup, and make sure it doesn't slide backwards as you tighten the bolts.
 

dmonkey

Well-known member
Joined
Jul 4, 2021
Messages
2,232
Location
🇺🇸
You can jam a rag between the sprocket and chain to keep the axle from sliding back as you tighten the axle nut.
 

m in sc

Well-known member
Joined
Feb 2, 2021
Messages
2,499
Location
Rockhill, SC
after you get it pushed forward, slightly tighten the axle nut to put a very light amount of tension on it.
then adjust as above and test as above, good method^ .
Then, tighten axle, if all good, check to make sure the adusters on the end cap are indeed seated. I usually get about 1/8~1/6th a turn on them when its all adjusted.
 

mcmd

Active member
Joined
Nov 3, 2022
Messages
225
Location
SW Ohio
after you get it pushed forward, slightly tighten the axle nut to put a very light amount of tension on it.
then adjust as above and test as above, good method^ .
Then, tighten axle, if all good, check to make sure the adusters on the end cap are indeed seated. I usually get about 1/8~1/6th a turn on them when its all adjusted.
Thank for your input. Can you clarify what you mean when you say you get 1/8 - 1/16 turn on them when it's all adjusted? Are we talking about the innermost nuts?
 
Top