What's new
Honda Trail 125 Forum

Welcome to the Honda Trail 125 Forum! We are an enthusiast forum for the Trail 125, Hunter Cub, CT125 or whatever it's called in your country. Feel free to join up and help us build an information resources for this motorcycle. Register a free account today to become a member. Once signed in, you'll be able to participate on this site by adding your own topics and posts, as well as connect with other members through your own private inbox!

Chain Tension Question

RandAlThor

New member
Joined
Feb 23, 2021
Messages
10
Is the 1.25” free-play spec with the bike on the center stand (i.e., rear shocks/arm extended) or on the kickstand/level, b/c it makes a big difference?
 

FRAC

Member
Joined
Jan 25, 2021
Messages
59
I bought this chain slack checking tool. It works pretty good once you figure out how to use it. Anyway my chain was a good 1/2" loose with only 400 miles on the bike! I also found some other things loose like the oil filter cap and another bolt. I'm not sure my Honda dealer did a good prep job, I know they were rushed when I went to pick it up.


SneakyDingo

Well-known member
Joined
Aug 6, 2021
Messages
1,567
I bought this chain slack checking tool. It works pretty good once you figure out how to use it. Anyway my chain was a good 1/2" loose with only 400 miles on the bike! I also found some other things loose like the oil filter cap and another bolt. I'm not sure my Honda dealer did a good prep job, I know they were rushed when I went to pick it up.

Interesting piece of equipment! Given we know the bike and don't have a reason to make a generalized adjustable model, 3D printing a small gauge with alignment holes along the lines of this would be child's play. I'll have to look into this later when I don't have to log in to work. Siri, remind me to do this later Playing the Beach Boys greatest hits

Pg 67 spec: 1.0 - 1.4 in (25 - 35 mm)
 

m in sc

Well-known member
Joined
Feb 2, 2021
Messages
2,492
Location
Rockhill, SC
i just use a 12" engineers rule. find the middle of the chain, set one end down of the scale on the ground, and check slack. pretty simple. you can use a 6" one off the bottom or top of the swingarm as well.
 

AstroStrat89

Member
Joined
Apr 6, 2021
Messages
60
I got the same tool because I am a noob and looking for anything to make it easier for me to maintain our bikes. One thing I don't quite understand is that the slack is a single measurement and not a minimum\maximum range. It seem that if the chain stretches consistently you would need to adjust it frequently. And for what its worth, my chain was only off about 5mm after 900 miles. But I really have no frame of reference other than what I read here and other sites.
 

m in sc

Well-known member
Joined
Feb 2, 2021
Messages
2,492
Location
Rockhill, SC
as long as you keep it oiled and clean, the chain will last longer than you might think. i kept one on my 99 sv for 33k miles and i was pretty ruthless on that bike, but always kept the chain clean and serviced. Running it dry, or in dirty situations, or rust for those that leave them outside is the worst you can do to them, but it happens. Just check it every few hundred miles, see where its at. stretch depends on usage and riding style and environment. you'll eventually figure out how many miles it takes to get out of adjustment on YOUR bike. for me, its its over 1/2" total out, i adjust.
 

Dakar Dan

Member
Joined
Apr 28, 2021
Messages
34
Keep it simple, quick and regular. Chain maintenance, that is!
The centre stand makes it so easy to clean & lube the chain. I’m just using a 50/50 mix of chainsaw bar lube & 90w transmission oil in an old pump can every couple of rides. Remember non oring chains don’t retain lube for very long.
 

m in sc

Well-known member
Joined
Feb 2, 2021
Messages
2,492
Location
Rockhill, SC
ive been using the maxima chain wax (spray) for years. it stays on really well. clean with wd 40, wipe down, let dry, hit with the maxima. just my preference. I used to do the ^ same thing, and it works really well) but the maxima will stay on longer and way, way less messy. .02
 

AZ7000'

Well-known member
Joined
Jan 28, 2021
Messages
969
I quit using chain lube 7 or so years ago on the big dirt bikes. I get a new x-ring chain and steel sprockets every 70 hours or yearly as needed for about $70 from Rocky Mountain. I do use lube on the kids 65cc 2t.
The lube > dry > clean > dry > lube ritual just wasn’t for me. Chain stays way cleaner too. I will wd-40 the crap out of them both before and after beach runs in Baja for rust reasons.
I do think I’ve sprayed something on the 1975 chain once or twice, still working 45 years later.
Ymmv
 

fmdualexhaust

Active member
Joined
Nov 30, 2020
Messages
216
Location
Central NY
ive been using the maxima chain wax (spray) for years. it stays on really well. clean with wd 40, wipe down, let dry, hit with the maxima. just my preference. I used to do the ^ same thing, and it works really well) but the maxima will stay on longer and way, way less messy. .02
Maxima is good stuff.
 

STUBBORN

Active member
Joined
Apr 21, 2021
Messages
219
I replaced the chain today.

I followed Migalito's advice

Used the New D.I.D 428vx gold x-ring 108 link chain.
(Keeping the other chain for a spare.)
I removed the plastic chain cover. Had to fumble around since I did
not know about the darn plastic piece on the end that slides into a
hidden slot on the frame. It's easy to see from the other side. (grumble)
I removed the plastic front sprocket cover.
Removing the stock D.I.D. chain was wicked easy.
Installing the new chain involved moving the rear tire frontwards
(inwards towards the engine).
After installing the new master link with 4 greased up X rings, I broke
the chain splitter tool. (grumble).
I improvised, adapted and overcame.
I carefully squeezed the outer link piece with the Japanese writing
facing outwards (Translation: this side out) on to the 2 press fit
shafts using 2 vice grips.
- tightening just a tiny scosh bit at a time so as to not squish the darn x rings.
Then it took me a very long time to install the clip.

I aligned the rear tire using the chain alignment tool looking down the chain
(hitting my head on the license plate). I also checked using a caliper on
the 2 adjusting bolts. I got them real close (under 2 mm). The alignment
lines are not correct on this bike - factory defect.
Then I reinstalled the plastic parts.
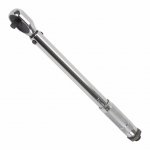
I used a $20 HF 3/8 drive click stop torque wrench for the first time.
HF torque wrench.jpg
Bike really is a lot better now with the tightened up new fancy X ring chain!
I can finally do figure 8s inside of 2 parking spaces.

Next up is the shift pedal shaft support.
 

SneakyDingo

Well-known member
Joined
Aug 6, 2021
Messages
1,567
I caved and bought a tool to help me with the master link, then ordered some more master links because I broke the little clip that goes over the the master link and my local shop didn't have any. They'll turn up soon... right... right?

I was trying to get a tiny bit more maintenance in before I started work and would have substantially less time per week to work on the bike. Silly me. At least it's pretty easy to feed a new chain through and fit the master link since the new-old chain is cut to the right length already.

EDIT: If I ever have to replace these on the road, I will absolutely use non-ringed chains. The master link for those goes on so easily.
 

FRAC

Member
Joined
Jan 25, 2021
Messages
59
I replaced the chain today.

I followed Migalito's advice

Used the New D.I.D 428vx gold x-ring 108 link chain.
(Keeping the other chain for a spare.)
I removed the plastic chain cover. Had to fumble around since I did
not know about the darn plastic piece on the end that slides into a
hidden slot on the frame. It's easy to see from the other side. (grumble)
I removed the plastic front sprocket cover.
Removing the stock D.I.D. chain was wicked easy.
Installing the new chain involved moving the rear tire frontwards
(inwards towards the engine).
After installing the new master link with 4 greased up X rings, I broke
the chain splitter tool. (grumble).
I improvised, adapted and overcame.
I carefully squeezed the outer link piece with the Japanese writing
facing outwards (Translation: this side out) on to the 2 press fit
shafts using 2 vice grips.
- tightening just a tiny scosh bit at a time so as to not squish the darn x rings.
Then it took me a very long time to install the clip.

I aligned the rear tire using the chain alignment tool looking down the chain
(hitting my head on the license plate). I also checked using a caliper on
the 2 adjusting bolts. I got them real close (under 2 mm). The alignment
lines are not correct on this bike - factory defect.
Then I reinstalled the plastic parts.
I used a $20 HF 3/8 drive click stop torque wrench for the first time.
View attachment 3699
Bike really is a lot better now with the tightened up new fancy X ring chain!
I can finally do figure 8s inside of 2 parking spaces.

Next up is the shift pedal shaft support.
Great write up!.. I'd like to know more about the difference in performance with the new chain. What differences does it make? I guess why would a new chain help you make tighter figure 8s ?
 

eastema

Active member
Joined
May 17, 2022
Messages
142
Location
Southern NH
I just give it a lift with the toe of my shoe before I get on to check for tension before I ride. Keeping it simple, adjust as needed.
 

STUBBORN

Active member
Joined
Apr 21, 2021
Messages
219
(sigh) I am not mechanically inclined. (But, but, yer a dwarf!)

The new tighter fancy chain and correctly aligned rear wheel, however, do make a difference in the Honda Trail's performance. Yesterday, I could not perform a figure 8 within 2 parking spaces.
Today, after the chain replacement, it was easy.

Maybe someone with more experience can explain the difference?
 
Top