As an ergonomic upgrade I installed a Pazzo adjustable shorty brake lever on my LRD. The main motivation for this is that with 2 finger braking the long end of the lever gets squeezed against my other 2 fingers that remain on the grip. Shorty brake levers expose less of the lever for it to bend or break in a crash (that risk is mostly eliminated by Barkbuster hand guards on mine) and are usually suitable for riders who use 1-3 fingers on the front brake, which is a good thing to get used to if you want to be able to effectively cover the brake while maintaining throttle control. Adjustable levers let you move the resting position of the lever further or nearer to the bar grip, so you can full squeeze the lever to the grip, full squeeze the lever and still have room to fit your non-braking fingers between it and the grip without crushing them, or somewhere in between. Useful for matching the lever position to the most comfortable spot for your grip and hand size.
I went with a Pazzo lever because I already have the same black on black levers on my Scrambler and know they've held up well for years and tens of thousands of miles already. CRG is another of the high quality reputable brands for aftermarket levers. I think the CRG RC2 2AN-571 from the Grom would fit the CT125, but do your own research or ask Constructors Racing Group support to confirm if you go that route. There are way cheaper made in China options available on the usual online marketplaces. A warning about those, sometimes they don't use a good alloy of aluminum where they will break easily or develop notches in the movement over time, they aren't always serviceable where you can't take the adjuster apart to clean and lubricate it, the CNC machining sometimes has defects, and by far the most common issue is that if you buy them anodized the color usually wears off or lightens over time. That being said, they're like $5-25 so knock yourself out if you want to give a cheap one a try and see how it goes.
To state the obvious here, our bike only has one lever but they're often sold in sets with the clutch lever, so best to try to find just the brake lever.
For Pazzo the compatible CT125 front brake lever is part number F-25, you can see a list of other bikes that use the same part number here: https://www.pazzoracing.com/guide.html
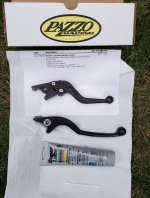
Knowing the part number and compatibility, I bought a "brake only" lever off of https://www.solomotoparts.com/Pazzo-Lever-Brake-for-CBR500R-13-15/ with options of a black adjuster on a black lever in the shorty length. Red adjuster on a black lever was tempting, but I didn't want to go down the rabbit hole of blinging out my bike with a bunch of red anodized parts.
Tools used: 10mm box wrench, grease, cotton swab
To remove the OEM lever you first remove the nut from the underside of the lever.
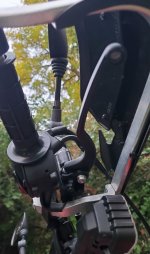
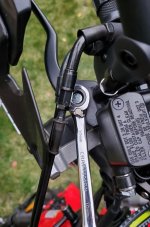
Next you remove the bolt from the top of the lever. There wasn't much room to do this with the throttle cables in the way so a I used the ratcheting box wrench to get it most of the way, and then used my fingers to get it the rest of the way. If you ratchet it all the way you'll be stuck with the bolt up against the throttle cable and no space to pull your wrench out. Luckily this whole job is just that 1 nut and bolt.
Here are the shorty lever and the OEM lever for comparison. Note that the ball end of the lever has a hole drilled through it, I find this useful for anytime you're doing maintenance and need the front brake engaged, you can just feed a zip-tie through the hole and then fasten it down tight around the bar grip. Useful for trying to bubble air out of the brake line when you're away from tools and supplies to do a proper brake bleed, and useful for locking up the front tire to more easily move the rear axle forward or back when doing chain maintenance.
Close up on the numbered adjuster notches. Before installing the new lever I used the cotton swab to apply grease to the inside of the bolt hole as well as the outer lip of it top and bottom since these are the contact points.
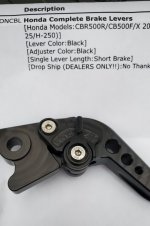
When installing the new lever the torque spec for the pivot bolt is 1Nm, and the torque spec for the pivot nut is 5.9Nm which are both very small amounts of force so be careful not to over tighten them. For the pivot bolt I basically just slowly tightened it until I felt some resistance and then stopped. Be sure to give the new lever a few test squeezes to make sure everything works as expected before riding.
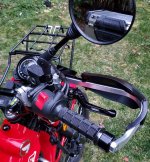
Here is the lever installed:
I went with a Pazzo lever because I already have the same black on black levers on my Scrambler and know they've held up well for years and tens of thousands of miles already. CRG is another of the high quality reputable brands for aftermarket levers. I think the CRG RC2 2AN-571 from the Grom would fit the CT125, but do your own research or ask Constructors Racing Group support to confirm if you go that route. There are way cheaper made in China options available on the usual online marketplaces. A warning about those, sometimes they don't use a good alloy of aluminum where they will break easily or develop notches in the movement over time, they aren't always serviceable where you can't take the adjuster apart to clean and lubricate it, the CNC machining sometimes has defects, and by far the most common issue is that if you buy them anodized the color usually wears off or lightens over time. That being said, they're like $5-25 so knock yourself out if you want to give a cheap one a try and see how it goes.
To state the obvious here, our bike only has one lever but they're often sold in sets with the clutch lever, so best to try to find just the brake lever.
For Pazzo the compatible CT125 front brake lever is part number F-25, you can see a list of other bikes that use the same part number here: https://www.pazzoracing.com/guide.html
Knowing the part number and compatibility, I bought a "brake only" lever off of https://www.solomotoparts.com/Pazzo-Lever-Brake-for-CBR500R-13-15/ with options of a black adjuster on a black lever in the shorty length. Red adjuster on a black lever was tempting, but I didn't want to go down the rabbit hole of blinging out my bike with a bunch of red anodized parts.
Tools used: 10mm box wrench, grease, cotton swab
To remove the OEM lever you first remove the nut from the underside of the lever.

Next you remove the bolt from the top of the lever. There wasn't much room to do this with the throttle cables in the way so a I used the ratcheting box wrench to get it most of the way, and then used my fingers to get it the rest of the way. If you ratchet it all the way you'll be stuck with the bolt up against the throttle cable and no space to pull your wrench out. Luckily this whole job is just that 1 nut and bolt.

Here are the shorty lever and the OEM lever for comparison. Note that the ball end of the lever has a hole drilled through it, I find this useful for anytime you're doing maintenance and need the front brake engaged, you can just feed a zip-tie through the hole and then fasten it down tight around the bar grip. Useful for trying to bubble air out of the brake line when you're away from tools and supplies to do a proper brake bleed, and useful for locking up the front tire to more easily move the rear axle forward or back when doing chain maintenance.

Close up on the numbered adjuster notches. Before installing the new lever I used the cotton swab to apply grease to the inside of the bolt hole as well as the outer lip of it top and bottom since these are the contact points.

When installing the new lever the torque spec for the pivot bolt is 1Nm, and the torque spec for the pivot nut is 5.9Nm which are both very small amounts of force so be careful not to over tighten them. For the pivot bolt I basically just slowly tightened it until I felt some resistance and then stopped. Be sure to give the new lever a few test squeezes to make sure everything works as expected before riding.
Here is the lever installed:

