I'm not a fan of the horn tone on most newer bikes so I swapped out the stock horn with a Denali Soundbomb Mini. The Mini is 113 db (on paper), compact, and doesn't draw enough current to need a new relay or additional wiring. I have also used the full size Soundbomb which is about 7 db louder on my Scrambler, but it is significantly larger where it would need to be mounted somewhere else on the bike such as crash bars, and it requires more wiring and a different horn relay since it draws more current. In my opinion the mini is fine for around town, the full size one has its place for loud highway riding.
Here is the info on the horn:
 denalielectronics.com
RevZilla also carries it for $29.99
denalielectronics.com
RevZilla also carries it for $29.99
You don't need the additional wiring harness unless you're mounting it somewhere else.
Tools used were a 10mm wrench, 10mm socket, and ratchet. I had the headlight off for other work which made it easier, but isn't necessary.
To mount the horn I first removed the old horn including both the bracket stack it is bolted to, and the horn stay bracket which mounts to the steering stem.

Stock horn in factory mounted position

Horn assembly detached from horn stay bracket.

On the left in this photo is the horn stay with a wiring retainer which is removed from the steering stem next. I did not reinstall this part because I want the horn to sit higher up so when I lift the front fender later it won't make contact with the horn when the front suspension is bottomed out. It also gets the horn out of the way visually so it's not hanging down. On the right in this photo is the stock horn.

Denali SoundBomb Mini plugged into the stock wiring harness with the black metal bracket stack from the stock horn installed and bent slightly toward the back of the bike when mounted. In this photo I have the black bracket stack mounted backwards on accident , you want the other side of the rubber spacer to mount against the steering stem.
If you peel back the cable plug boots you can see the wire colors. Light green is the positive lead, dark green is the negative/ground lead.

Here is the horn all wired up and mounted. The trumpet needs to point downward so it can properly drain road spray and rain. It is a tight fit and I had to readjust the position and the slight bend in the bracket a few times to get it right so it isn't rubbing against anything. Will certainly re-check it down the road to see how its held its position.
Before you ride the bike you want to turn the steering full lock side to side with the bike running and make sure none of the cables get pulled and all the control work as expected.
Now for the audio!
Here is a clip of the stock horn:

Here is a clip of the Denali SoundBomb Mini horn:

 gfycat.com
Here is the info on the horn:
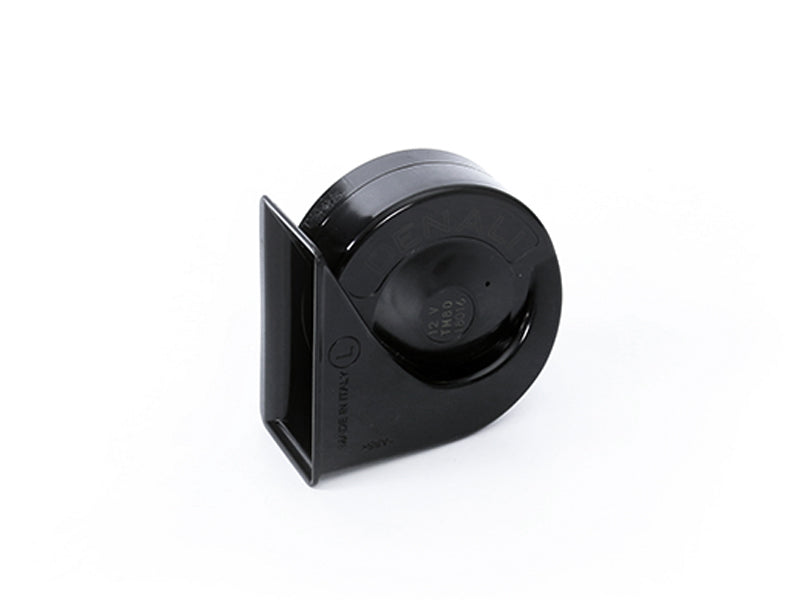
SoundBomb™ Mini Electromagnetic Low Tone Horn
At 113 decibels, the distinct low-tone sound from the DENALI SoundBomb Mini Motorcycle Horn is twice as loud as a typical 100 decibel disc horn. Designed to be a direct Plug & Play upgrade from your factory horn, requiring no additional relay or wiring harness as long as the original horn has...
denalielectronics.com
You don't need the additional wiring harness unless you're mounting it somewhere else.
Tools used were a 10mm wrench, 10mm socket, and ratchet. I had the headlight off for other work which made it easier, but isn't necessary.
To mount the horn I first removed the old horn including both the bracket stack it is bolted to, and the horn stay bracket which mounts to the steering stem.
Stock horn in factory mounted position
Horn assembly detached from horn stay bracket.
On the left in this photo is the horn stay with a wiring retainer which is removed from the steering stem next. I did not reinstall this part because I want the horn to sit higher up so when I lift the front fender later it won't make contact with the horn when the front suspension is bottomed out. It also gets the horn out of the way visually so it's not hanging down. On the right in this photo is the stock horn.
Denali SoundBomb Mini plugged into the stock wiring harness with the black metal bracket stack from the stock horn installed and bent slightly toward the back of the bike when mounted. In this photo I have the black bracket stack mounted backwards on accident
, you want the other side of the rubber spacer to mount against the steering stem.If you peel back the cable plug boots you can see the wire colors. Light green is the positive lead, dark green is the negative/ground lead.
Here is the horn all wired up and mounted. The trumpet needs to point downward so it can properly drain road spray and rain. It is a tight fit and I had to readjust the position and the slight bend in the bracket a few times to get it right so it isn't rubbing against anything. Will certainly re-check it down the road to see how its held its position.
Before you ride the bike you want to turn the steering full lock side to side with the bike running and make sure none of the cables get pulled and all the control work as expected.
Now for the audio!
Here is a clip of the stock horn:
Here is a clip of the Denali SoundBomb Mini horn:
Denali SoundBomb Mini Horn CT125 GIF | Gfycat
Watch and share Denali SoundBomb Mini Horn CT125 GIFs on Gfycat
gfycat.com
Last edited:


