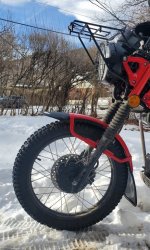
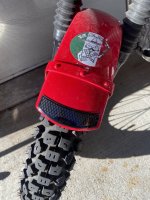
Previously I had shared my concerns and disappointment with a front fender lift kit, so I finally got around to re-drilling the fender itself to get better clearance for knobby tires (Shinko SR241 2.75x17). Since I took the fender off to drill some holes, I also took the opportunity to install a mud guard and mud flap.
My motivations for this are to reduce the noise of gravel bouncing in the fender, reduce mud, water, and slush spray from the front tire, and of course aesthetics because who are we kidding, we all bought the bike for a combination of both form and function.
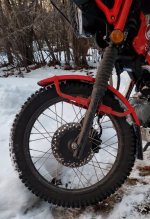
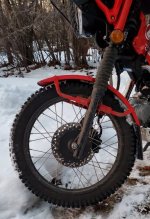
This is the stock fender mount location with Shinko SR241s mounted.
Here are the parts I purchased:
* Moto Salgo: Front Mudguard - https://japan.webike.net/products/24577172.html
* Moto Salgo: Front Mud Flap - https://japan.webike.net/products/24577173.html
Tools used:
Socket wrench, 10mm socket, 12mm socket, 19mm socket, 14mm wrench, torque wrench, electric drill, drill bit set (used 1/8" - 1/4", could get away with just 1/4"), permanent marker, metal file, an automatic center hole punch tool, PH3 Phillips screwdriver (impact screwdriver w/ hammer preferred)
Other supplies: waterproof grease, blue threadlocker, and paper towels.
To remove the front fender I first put the bike on its center stand, put some weight on the rear of the bike to lift the front tire off the ground, removed the front axle (14mm axle bolt, 19mm axle nut), removed the front wheel being careful not to lose the "collar" spacers that the axle passes through on each side of the wheel. The higher you can get the front wheel off the ground, the easier the wheel removal is. Next I removed the front brake caliper (2x 12mm bolts), and returned the bolts back to the caliper so I wouldn't lose them after removing from their mount point on the fork. With the brake caliper out of the way I then removed the 4x 10mm bolts holding the fender in place. The fender is then able to be slid down the length of the forks and slide out the bottom without much fuss, though if you are particular about your paint you may want to take the precaution of taping the fender and the inside of the forks with painter's tape to prevent scratching.
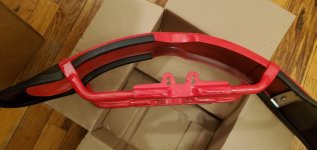
With the fender off and after a quick rinse and dry I then started mounting the front mud guard. The stiffer part of it simply bends to fit the shape of the fender which partially holds it in place, and then there is an exterior molding strip with a channel in it that fits snugly over the fender to help hold it in place.
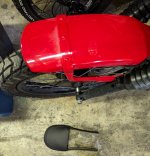
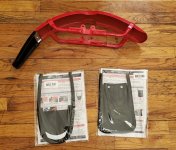
Here's the front fender and the new mud flap and mud guard kits.
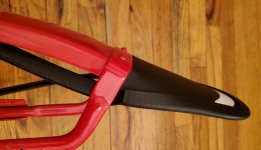
This photo shows how the mud guard bends around the shape of the fender, the molding strip has a channel in it and clamps over the edge of the fender once installed.
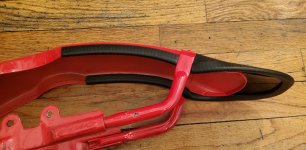
The mud guard adds about 2.5" length to the fender. I was surprised that the inner fender wasn't missing more paint from gravel based on the sounds I had heard and how soft the paint is on this bike. Those little black specks are the most of the damage from rocks jamming between the knobbies and fender.
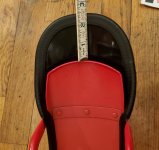
For the rear mud flap I first removed the two screws that hold it in place, they were quite tight and I didn't want to risk stripping the heads so I used an Impacta 980 impact screwdriver and hammer. You place the Impacta on the screw, tap the end of it with a hammer, and the spring & cam mechanism inside of it turns the screw 12⁰ counter-clockwise with each tap until it's loose enough to use as a regular screwdriver. The OE mud flap is very flexible while the Moto Salgo mud flap is more firm and a larger size that should block more road debris. The mud flap came with replacement washers for mounting that are the same as the OE ones in size and appearance. I then screwed the new mud flap into place, fit the exterior molding strip's channel around the fender to snug it into place, and got ready to start drilling holes in stuff.
Here is the fender with the OE mud flap mounted.
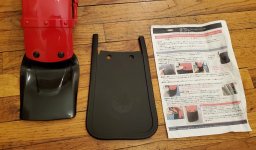
Size comparison of OE mud flap over Moto Salgo mud flap with mounting holes aligned. The Moto Salgo mud flap is stiffer and about 1 3/8" longer
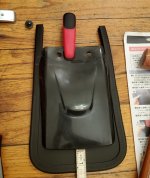
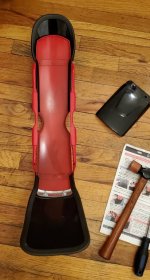
For drilling the new front fender holes I just eyeballed them based on the marks left by the washers from the bolts that were in the original holes. If you drill the new holes too low they'll be at a spot in the fender where the shape of it won't fit the forks well. I marked the center of where the new holes should be drilled with a permanent marker, then once satisfied with them I marked them with the automatic center hole punch tool which punches a divot in the metal that is used to align the drill bit for starting a hole. I started the hole with a 1/8" bit so if I messed up it could be saved, then worked my way up to a 1/4" bit which is just slightly larger than the original holes are. I used a metal file to clean up the back side of the drill holes, though stepping through multiple bit sizes left fairly clean cut holes. I wiggled the drill a bit on the rear two holes so they would be slightly oblong in shape similar to the OE rear holes, allowing for easier fitment of the fender bolts.
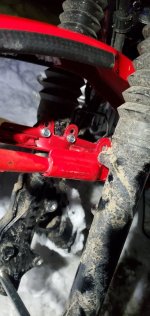
The new fender mount holes are the lower ones.
For reassembly I slid the front fender into place, but before securing the bolts I slid the axle through the forks to align them. With the forks aligned I installed the 4x 10mm fender bolts to German specs (gutentight). Then I wiped down the front axle and both "collar" wheel spacers with a paper towel, applied some Maxima waterproof grease to the axle and the inside of the boots in the wheel that the collars came out of. Lifting the front wheel into place can be a pain, I set it on the toe of my boot and used that leverage to get it to the right height while holding the wheel on each side and using my fingers to keep the collars in place. With it lined up I tapped the axle through, put a 14mm wrench on the bolt side, 19mm on the axle nut side with a torque wrench, and tightened to 59 N-m. Re-fitting the front brake caliper is a bit easier to do after installing the wheel, rather than trying to install the wheel and slide the rotor between the pads with it already installed. To re-install the front brake rotor I removed the two 12mm bolts I had left in it from earlier, applied some blue threadlocker to them, slid the caliper over the brake rotor, aligned the holes, installed the two bolts and torqued to 30 N-m.
Photo shows inner and outer view of new front fender mount holes with bolts through them.
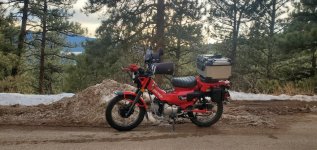
Finally I checked clearances, pumped the front brake a few times, and the little Hunter Cub was trail ready again.
Edit: CAUTION - Raise the horn location before lifting the fender to avoid having the horn bracket dent the fender when the front suspension bottoms out. I had already done this prior to raising the fender because I installed a Denali Soundbomb Mini horn.
My motivations for this are to reduce the noise of gravel bouncing in the fender, reduce mud, water, and slush spray from the front tire, and of course aesthetics because who are we kidding, we all bought the bike for a combination of both form and function.
This is the stock fender mount location with Shinko SR241s mounted.

Here are the parts I purchased:
* Moto Salgo: Front Mudguard - https://japan.webike.net/products/24577172.html
* Moto Salgo: Front Mud Flap - https://japan.webike.net/products/24577173.html
Tools used:
Socket wrench, 10mm socket, 12mm socket, 19mm socket, 14mm wrench, torque wrench, electric drill, drill bit set (used 1/8" - 1/4", could get away with just 1/4"), permanent marker, metal file, an automatic center hole punch tool, PH3 Phillips screwdriver (impact screwdriver w/ hammer preferred)
Other supplies: waterproof grease, blue threadlocker, and paper towels.
To remove the front fender I first put the bike on its center stand, put some weight on the rear of the bike to lift the front tire off the ground, removed the front axle (14mm axle bolt, 19mm axle nut), removed the front wheel being careful not to lose the "collar" spacers that the axle passes through on each side of the wheel. The higher you can get the front wheel off the ground, the easier the wheel removal is. Next I removed the front brake caliper (2x 12mm bolts), and returned the bolts back to the caliper so I wouldn't lose them after removing from their mount point on the fork. With the brake caliper out of the way I then removed the 4x 10mm bolts holding the fender in place. The fender is then able to be slid down the length of the forks and slide out the bottom without much fuss, though if you are particular about your paint you may want to take the precaution of taping the fender and the inside of the forks with painter's tape to prevent scratching.
With the fender off and after a quick rinse and dry I then started mounting the front mud guard. The stiffer part of it simply bends to fit the shape of the fender which partially holds it in place, and then there is an exterior molding strip with a channel in it that fits snugly over the fender to help hold it in place.
Here's the front fender and the new mud flap and mud guard kits.

This photo shows how the mud guard bends around the shape of the fender, the molding strip has a channel in it and clamps over the edge of the fender once installed.


The mud guard adds about 2.5" length to the fender. I was surprised that the inner fender wasn't missing more paint from gravel based on the sounds I had heard and how soft the paint is on this bike. Those little black specks are the most of the damage from rocks jamming between the knobbies and fender.

For the rear mud flap I first removed the two screws that hold it in place, they were quite tight and I didn't want to risk stripping the heads so I used an Impacta 980 impact screwdriver and hammer. You place the Impacta on the screw, tap the end of it with a hammer, and the spring & cam mechanism inside of it turns the screw 12⁰ counter-clockwise with each tap until it's loose enough to use as a regular screwdriver. The OE mud flap is very flexible while the Moto Salgo mud flap is more firm and a larger size that should block more road debris. The mud flap came with replacement washers for mounting that are the same as the OE ones in size and appearance. I then screwed the new mud flap into place, fit the exterior molding strip's channel around the fender to snug it into place, and got ready to start drilling holes in stuff.
Here is the fender with the OE mud flap mounted.

Size comparison of OE mud flap over Moto Salgo mud flap with mounting holes aligned. The Moto Salgo mud flap is stiffer and about 1 3/8" longer


For drilling the new front fender holes I just eyeballed them based on the marks left by the washers from the bolts that were in the original holes. If you drill the new holes too low they'll be at a spot in the fender where the shape of it won't fit the forks well. I marked the center of where the new holes should be drilled with a permanent marker, then once satisfied with them I marked them with the automatic center hole punch tool which punches a divot in the metal that is used to align the drill bit for starting a hole. I started the hole with a 1/8" bit so if I messed up it could be saved, then worked my way up to a 1/4" bit which is just slightly larger than the original holes are. I used a metal file to clean up the back side of the drill holes, though stepping through multiple bit sizes left fairly clean cut holes. I wiggled the drill a bit on the rear two holes so they would be slightly oblong in shape similar to the OE rear holes, allowing for easier fitment of the fender bolts.
The new fender mount holes are the lower ones.

For reassembly I slid the front fender into place, but before securing the bolts I slid the axle through the forks to align them. With the forks aligned I installed the 4x 10mm fender bolts to German specs (gutentight). Then I wiped down the front axle and both "collar" wheel spacers with a paper towel, applied some Maxima waterproof grease to the axle and the inside of the boots in the wheel that the collars came out of. Lifting the front wheel into place can be a pain, I set it on the toe of my boot and used that leverage to get it to the right height while holding the wheel on each side and using my fingers to keep the collars in place. With it lined up I tapped the axle through, put a 14mm wrench on the bolt side, 19mm on the axle nut side with a torque wrench, and tightened to 59 N-m. Re-fitting the front brake caliper is a bit easier to do after installing the wheel, rather than trying to install the wheel and slide the rotor between the pads with it already installed. To re-install the front brake rotor I removed the two 12mm bolts I had left in it from earlier, applied some blue threadlocker to them, slid the caliper over the brake rotor, aligned the holes, installed the two bolts and torqued to 30 N-m.
Photo shows inner and outer view of new front fender mount holes with bolts through them.

Finally I checked clearances, pumped the front brake a few times, and the little Hunter Cub was trail ready again.
Edit: CAUTION - Raise the horn location before lifting the fender to avoid having the horn bracket dent the fender when the front suspension bottoms out. I had already done this prior to raising the fender because I installed a Denali Soundbomb Mini horn.
Last edited:

