From MNNTHBX (MAN IN THE BOX)'s product page for the bushing kit:
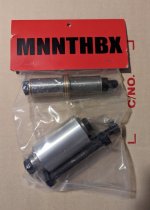
 I've read about these on Grom forums and @m in sc has mentioned them a few times so I decided to give the bronze bushings a try to compliment the Ohlins suspension upgrades on my CT125. Some of the cheaper motorcycles I've owned have had the rubber bushings like the Honda mini motos come with, while others have had bronze bushings like those in this kit, or even fancy needle roller bearings.
I ordered the bushings with the install kit which made pressing the old bushings out and the new ones in an absolute breeze. There is no reaming to do.
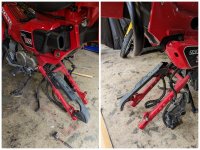
Most of the work was disassembling the motorcycle to remove the swingarm, and then reassembly. To remove the swingarm I removed the rear axle and wheel, moved the rear brake caliper out of the way, disconnected the rear brake line retainer that bolts to the right side of the swingarm, removed the snorkel, removed the top half of my aftermarket Outex exhaust, removed both shocks, removed the chain guard, removed the chain slider (not necessary until pressing the bushing out on that side), removed the left swingarm pivot cover (the black metal panel), and removed the swingarm bolt. I left the chain attached as well as the gearshift pedal. The chain can be manipulated to pull the swingarm out without disconnecting it, and the OEM gearshift pedal simply needs to be pressed down on the heel portion to allow room to slide the swingarm pivot bolt out through the left side. Immediately after disconnecting the shocks and moving the swingarm on the pivot with OEM bushings the issue mentioned in the product description above was observed, the swingarm resisted movement, partially due to the torque spec applied to it, but also because the bushings don't move freely and the rubber binds and then wants to snap back to place.
I put the stainless steel outer bushings in the freezer overnight before install, and followed this installation video:
Some notes on installation: You absolutely should grease the threads on the bolts used to press the bushings out and in. I found a YouTube video where a guy stripped the threads on a hardened press kit bolt and I can only imagine that it wasn't lubricated, as I had no such issue. There will be a lot of friction when pressing the bushings in where even though they were frozen they'll get warm, I wiped the "sweat" off the bushings hoping to keep some moisture from being pressed in with the grease. Working on the floor worked fine for me, if you're not as agile you might want to wrap the swingarm in a towel and hold it in a bench vise. I used some paper towels to prevent hitting the ratchet that I used against the swingarm and chipping the paint... though my Trail is no show bike. The MNNTHBX video recommended using a breaker bar, I was using an old and abused 3/8" ratchet where no tears would be shed if the teeth finally broke on it, but it held up fine. I also took the opportunity to clean the swingarm, chain guard, chain slider, shocks, and a few other things as they're easier to wipe down when removed from the motorcycle. Some 10:1 water and Simple Green in a spray bottle worked well as a degreaser wiped off with paper shop towels.
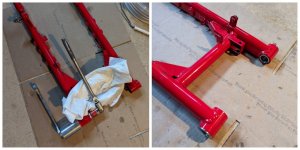
Pressing out the old bushing. New bushings pressed in.
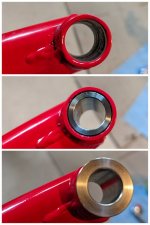
Swingarm with bushing removed, then inner view of new stainless outer bushing, then outer view of new stainless outer bushing.
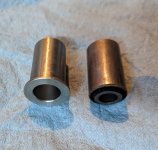
Side by side of new outer stainless bushing (frozen) next to OEM bushing with rubber.
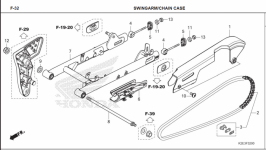
Here is the parts diagram to illustrate the OEM assembly.
The MNNTHBX bushings, once fully assembled with stainless steel outers and bronze inners, are longer than the OEM bushings. On the Honda Grom I believe there is a washer on each side which is not reinstalled to make up for this difference. On the CT125 if you look at the diagram above, there is a washer to omit labeled part #9 (right side of the motorcycle), but on the left side of the motorcycle there is not an inner washer, the washer grouped together with the nut and referencing section F-39 sits outside the black pivot cover on the left side of the motorcycle while the integrated bolt head on the pivot bolt snugs up against the exterior of the bushing. When I measured the right side OEM bushing and the washer labeled #9 and then measured the MNNTHBX bushing fully installed I found that the MNNTHBX assembly was around 0.01" wider. This was using a worn out Harbor Freight digital caliper that I had available to me, but taking the measurements a few times and comparing between the two there was definitely a difference. I considered turning the right side bushing down a bit on a lathe or surface grinding the inside of the pivot cover that the right side bushing presses against, then my brother who stopped by reminded me that the bike I'm working on is basically a motorized wheelbarrow and not a Ducati Panigale. A good reminder not to overthink things.
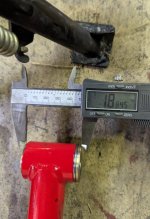
Measuring the width of new bushing, stainless outer with bronze inner. The OEM bushing + washer on the right side of the swingarm measured around 1.8725"
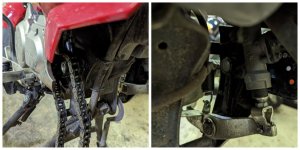
I loosened the right side pivot cover, the swingarm fit in fine with that extra clearance. I installed the pivot bolt and then tightened everything to spec. Before tightening to spec the swingarm bolt had some observable play within the inner diameter of the new bronze bushings, once tightened to spec I couldn't clunk it around anymore by hand at least. Washer #9 is the only part that was not reinstalled. With the shocks still removed, once the swingarm was tightened to spec, it again resisted movement to some extent but it did not spring back.
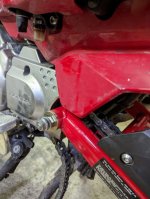
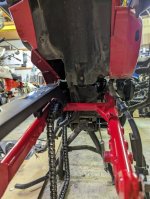
With the motorcycle assembled again, just sitting on it there is suspension sag that was not as noticeable before. I only put a few street miles on it for testing tonight. Got up to 58 mph but will have to travel some ways to get to a downhill where I can really try pushing it near 60 mph to see how it behaves at higher speed. My first ride impressions, which are just my perceptions and not necessarily anything measurable, are that there seems to be more road feel. For better or worse, every bump in the road is felt. I may reduce the preload settings if this bothers me, but will try to do some trail riding first to see how it feels all around. The suspension feels like it works better in that it is actually traveling freely for large bumps. At 58 mph the Trail might be less sketchy than it was before. This was with minimal load on the motorcycle, myself (140 lbs + gear) and my Expedition 134 top box with maybe 5-10 lbs of tools and items in it. The front end still does not feel grounded well at that speed, it's a bit light. Overall I think the difference is substantial with the shocks removed, and then with them installed sitting on the motorcycle, but it's hard for me to make a judgement on if I prefer the bronze bushings for riding yet. The argument for them certainly makes sense and the OEM ones are observably bad, but time will tell the real story. I have over 3,000 miles of riding tentatively planned for the CT125 before the year is over, so hopefully will be able to report back in a few months with a long term review. In the meantime, anyone curious can know that the bushing kit fits (close enough).
While I had the swingarm off I also measured from the swingarm pivot to the chain adjuster marks, and the marks on my CT125 measure dead on the same between the left and right sides. I know others have mentioned that theirs are off a bit, so there seems to be some variation there. I was happy to know that mine are accurate for use though.
About MNNTHBX Bronze Swingarm Bushing Kit for Honda Grom / Monkey
Fits any year Honda Grom or Monkey. BY FAR the single largest improvement you can do to your Grom/Monkey suspension. Our exclusive swingarm bushing kit is a total transformation from the OEM vulcanized rubber solid pivot mounts. (If you've never felt the stock bushings with the shock off, you'd be amazed, as they SEVERELY restrict swingarm motion.) Constructed from stainless and bearing bronze, they're basically maintenance free and outlast your bike. Our optional install kit: If you're highly mechanical, and have access to plenty of appropriate equipment, you may be able to save a few bucks and get this kit installed. If not, buy the tool. It's designed specifically for the Grom & Monkey swingarms, and will save you more time, money, and anger than you know...
I ordered the bushings with the install kit which made pressing the old bushings out and the new ones in an absolute breeze. There is no reaming to do.

Most of the work was disassembling the motorcycle to remove the swingarm, and then reassembly. To remove the swingarm I removed the rear axle and wheel, moved the rear brake caliper out of the way, disconnected the rear brake line retainer that bolts to the right side of the swingarm, removed the snorkel, removed the top half of my aftermarket Outex exhaust, removed both shocks, removed the chain guard, removed the chain slider (not necessary until pressing the bushing out on that side), removed the left swingarm pivot cover (the black metal panel), and removed the swingarm bolt. I left the chain attached as well as the gearshift pedal. The chain can be manipulated to pull the swingarm out without disconnecting it, and the OEM gearshift pedal simply needs to be pressed down on the heel portion to allow room to slide the swingarm pivot bolt out through the left side. Immediately after disconnecting the shocks and moving the swingarm on the pivot with OEM bushings the issue mentioned in the product description above was observed, the swingarm resisted movement, partially due to the torque spec applied to it, but also because the bushings don't move freely and the rubber binds and then wants to snap back to place.

I put the stainless steel outer bushings in the freezer overnight before install, and followed this installation video:

Pressing out the old bushing. New bushings pressed in.

Swingarm with bushing removed, then inner view of new stainless outer bushing, then outer view of new stainless outer bushing.

Side by side of new outer stainless bushing (frozen) next to OEM bushing with rubber.

Here is the parts diagram to illustrate the OEM assembly.
The MNNTHBX bushings, once fully assembled with stainless steel outers and bronze inners, are longer than the OEM bushings. On the Honda Grom I believe there is a washer on each side which is not reinstalled to make up for this difference. On the CT125 if you look at the diagram above, there is a washer to omit labeled part #9 (right side of the motorcycle), but on the left side of the motorcycle there is not an inner washer, the washer grouped together with the nut and referencing section F-39 sits outside the black pivot cover on the left side of the motorcycle while the integrated bolt head on the pivot bolt snugs up against the exterior of the bushing. When I measured the right side OEM bushing and the washer labeled #9 and then measured the MNNTHBX bushing fully installed I found that the MNNTHBX assembly was around 0.01" wider. This was using a worn out Harbor Freight digital caliper that I had available to me, but taking the measurements a few times and comparing between the two there was definitely a difference. I considered turning the right side bushing down a bit on a lathe or surface grinding the inside of the pivot cover that the right side bushing presses against, then my brother who stopped by reminded me that the bike I'm working on is basically a motorized wheelbarrow and not a Ducati Panigale. A good reminder not to overthink things.

Measuring the width of new bushing, stainless outer with bronze inner. The OEM bushing + washer on the right side of the swingarm measured around 1.8725"

I loosened the right side pivot cover, the swingarm fit in fine with that extra clearance. I installed the pivot bolt and then tightened everything to spec. Before tightening to spec the swingarm bolt had some observable play within the inner diameter of the new bronze bushings, once tightened to spec I couldn't clunk it around anymore by hand at least. Washer #9 is the only part that was not reinstalled. With the shocks still removed, once the swingarm was tightened to spec, it again resisted movement to some extent but it did not spring back.


With the motorcycle assembled again, just sitting on it there is suspension sag that was not as noticeable before. I only put a few street miles on it for testing tonight. Got up to 58 mph but will have to travel some ways to get to a downhill where I can really try pushing it near 60 mph to see how it behaves at higher speed. My first ride impressions, which are just my perceptions and not necessarily anything measurable, are that there seems to be more road feel. For better or worse, every bump in the road is felt. I may reduce the preload settings if this bothers me, but will try to do some trail riding first to see how it feels all around. The suspension feels like it works better in that it is actually traveling freely for large bumps. At 58 mph the Trail might be less sketchy than it was before. This was with minimal load on the motorcycle, myself (140 lbs + gear) and my Expedition 134 top box with maybe 5-10 lbs of tools and items in it. The front end still does not feel grounded well at that speed, it's a bit light. Overall I think the difference is substantial with the shocks removed, and then with them installed sitting on the motorcycle, but it's hard for me to make a judgement on if I prefer the bronze bushings for riding yet. The argument for them certainly makes sense and the OEM ones are observably bad, but time will tell the real story. I have over 3,000 miles of riding tentatively planned for the CT125 before the year is over, so hopefully will be able to report back in a few months with a long term review. In the meantime, anyone curious can know that the bushing kit fits (close enough).
While I had the swingarm off I also measured from the swingarm pivot to the chain adjuster marks, and the marks on my CT125 measure dead on the same between the left and right sides. I know others have mentioned that theirs are off a bit, so there seems to be some variation there. I was happy to know that mine are accurate for use though.
Last edited:
