What's new
Honda Trail 125 Forum

Welcome to the Honda Trail 125 Forum! We are an enthusiast forum for the Trail 125, Hunter Cub, CT125 or whatever it's called in your country. Feel free to join up and help us build an information resources for this motorcycle. Register a free account today to become a member. Once signed in, you'll be able to participate on this site by adding your own topics and posts, as well as connect with other members through your own private inbox!

New 24 - mods

Markbxr400

Member
Joined
Mar 15, 2024
Messages
49
Location
Magnolia Springs, AL
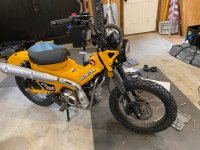
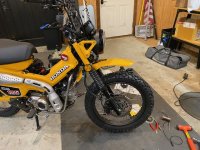
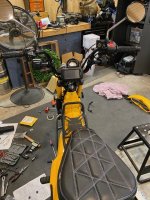
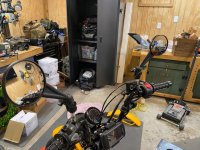
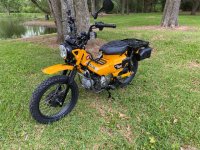
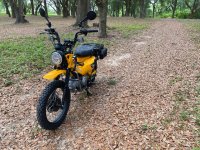
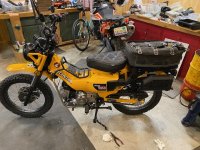
Picked up a new 24 a couple of weeks ago. Ordered the parts, most of which just came in, so getting started. The current plan:

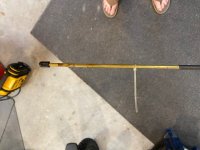
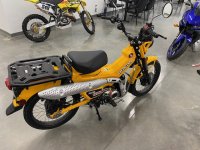
- Cut that tailbone crushing grab handle off the rear rack - DONE
- Install new seat (slim Diablo) - received surprisingly in about 6 days from BeezDeals. DONE
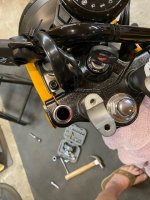
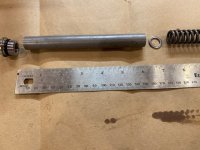
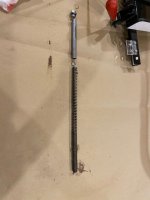
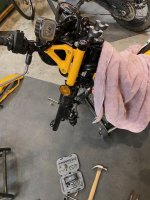
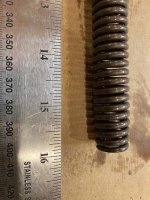
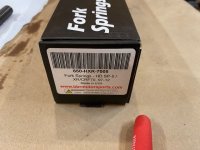
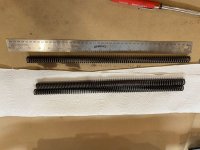
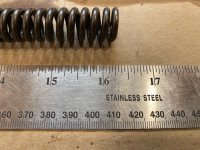
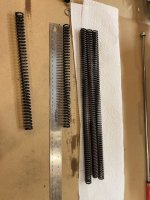
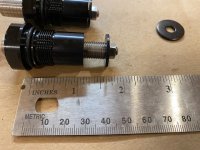
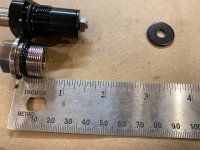
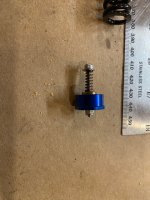
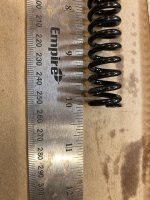
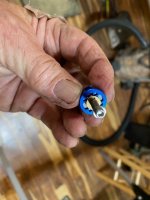
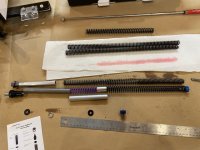
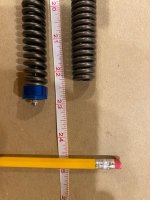
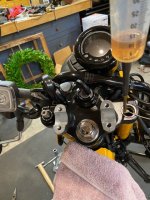
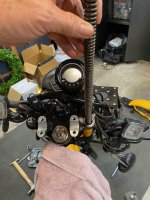
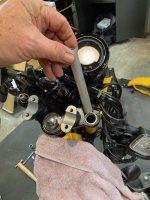
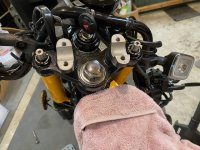
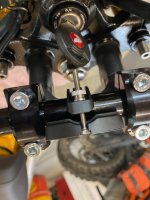
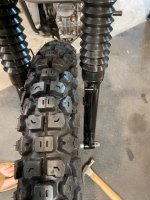
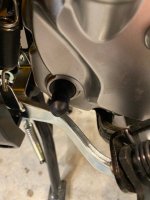
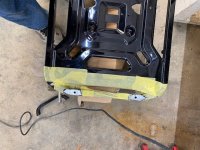
- Install new front springs. Have received the RacingBros antidive system, along with the Chimera front fork lowering kit - basically a supplemental spring/spacer to restore the travel that's lost by the short spring antidive kit. However, I also ordered and received the BBR XR70 springs, which I think I'll install with the antidive valve and adj pre-load caps. I'll measure the stock spring + spacer length, and then cut down a spacer to get the valve + spring + spacer + preload cap (with no initial preload) to match the stock length. Then I can add preload as needed. Will report back how this works out. Was going to try the RacingBros spring + Chimera spring, but am still guessing that it will be so stiff as to effectively lose travel. DONE
- Rear shock, going to keep the stock shock for the moment and try the bike out on the Smokey Mountain 500. If it works, I'll keep it, if not I'll upgrade.
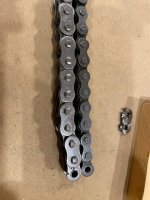
- DID 428VX chain (staying with stock sprockets) - Summit Racing had them. Received.DONE
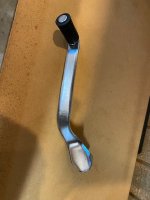
- Cut heel shifter (ultimately find replacement with folding tip) DONE
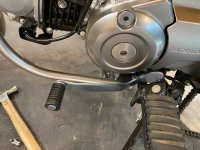
- remove kick starter and store in toolbox DONE
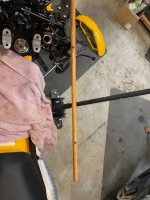
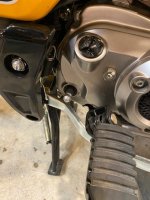
- Extend side stand. May remove center stand.
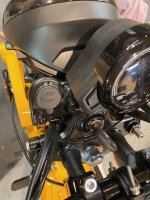
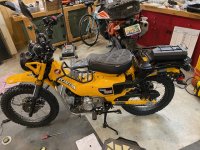
- Diablo high front fender - DONE
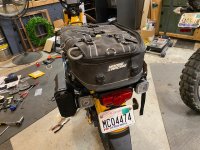
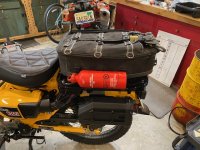
- Motoskill center rack - DONE
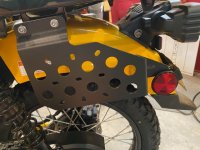
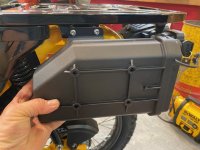
- GCraft side rack with Givi S250 tool box - DONE
- Relocate OEM toolbox
- KRITAUTO replacement LED headlights + frame/rack - May be as late as early June before I receive it.
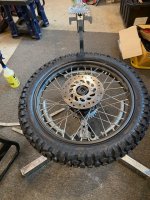
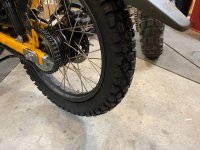
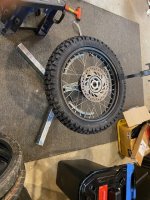
- Shinko 244 3.0-17 front and rear with new IRC tubes - DONE
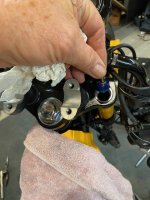
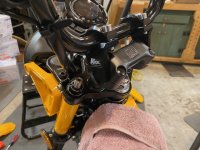
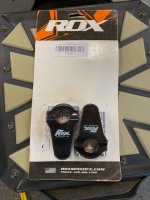
- RoxRisers - DONE
- Doubletake mirrors - DONE
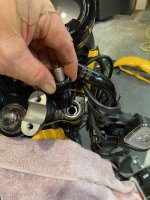
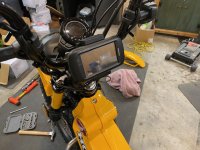
- Garmin powered AMP mount for Montana 680T - DONE
- USB power outlet - DONE
- Battery Tender pigtail - DONE
- After I return from the SM500, have the following powder-coated matte dark gray: frame down tubes, center rack, side rack, rear rack, skid plate, exhaust shields
- Plan to use my existing Moose Racing rear bag, Giant Loop bar bag and Giant Loop 1 gallon gas bag.
 

Attachments

  • IMG_5740.JPG
    IMG_5740.JPG
    87.5 KB · Views: 29
  • IMG_5521.JPG
    IMG_5521.JPG
    150 KB · Views: 29
  • IMG_5749.JPG
    IMG_5749.JPG
    119.3 KB · Views: 29
Last edited:

Markbxr400

Member
Joined
Mar 15, 2024
Messages
49
Location
Magnolia Springs, AL
Made some progress today:

1. Cut the shift lever. Does anyone know whether the folding shift lever from Honda fits the 23/24 models? May cut one of those and replace the fixed one. The lever has an odd shape and bends. So far, have not found anything that works absent making one.
 

Attachments

  • IMG_5775.JPG
    IMG_5775.JPG
    58.3 KB · Views: 11
  • IMG_5777.JPG
    IMG_5777.JPG
    72 KB · Views: 11
  • IMG_5783.JPG
    IMG_5783.JPG
    94.8 KB · Views: 12

Markbxr400

Member
Joined
Mar 15, 2024
Messages
49
Location
Magnolia Springs, AL
2. Tires and Chain:

Bummer - DID 428VX118 chain said it came with a master link, but nothing in the box. Bought a 118 link, so cut it down to 108. Have contacted vendor for the master link, but also have expedited one from AMZN.

Mounted up the 3" Shinko 244's and IRC tubes front and rear. Dang those axles are small! My smallest mounting pin for my Rabaconda was too large. Fixing a rear flat on the trail will be a lot of fun!
 

Attachments

  • IMG_5782.JPG
    IMG_5782.JPG
    77.2 KB · Views: 10
  • IMG_5787.JPG
    IMG_5787.JPG
    107.7 KB · Views: 10
  • IMG_5788.JPG
    IMG_5788.JPG
    116.3 KB · Views: 10
  • IMG_5789.JPG
    IMG_5789.JPG
    100.3 KB · Views: 10

dmonkey

Well-known member
Joined
Jul 4, 2021
Messages
2,270
Location
🇺🇸
Does anyone know whether the folding shift lever from Honda fits the 23/24 models?
Yes, the OEM accessory folding shift lever only fits the JA65 (2023-2024).

The axle is around 12mm. I have a Kaurimoto "The Original Tire Mounting Tool" with the SuperAxle kit and that fits the CT125 wheels.
 

Markbxr400

Member
Joined
Mar 15, 2024
Messages
49
Location
Magnolia Springs, AL
3. Front forks. Sorting through options. BTW, I weigh 220lbs + gear, thus the interest in heavier springs.

First, here is simply the stock setup with measurements, just so it's documented here, Note that when I pulled the cap, the top spacer was essentially flush with the top of the fork tube, so it had about 1/2" of preload.:

The cap threads into the tube ~ 1/2"
Below this is the tube spacer ~ 6"
Next is a washer
Then the progressive spring, which is 15-7/8" long

Sum total parts from the top of the fork tube is 1/2 + 6 + 15-7/8 = 22-3/8"
 

Attachments

  • IMG_5791.JPG
    IMG_5791.JPG
    78 KB · Views: 9
  • IMG_5793.JPG
    IMG_5793.JPG
    106.7 KB · Views: 9
  • IMG_5792.JPG
    IMG_5792.JPG
    51.5 KB · Views: 9
  • IMG_5790.JPG
    IMG_5790.JPG
    88.4 KB · Views: 9
  • IMG_5795.JPG
    IMG_5795.JPG
    85.3 KB · Views: 9
Last edited:

Markbxr400

Member
Joined
Mar 15, 2024
Messages
49
Location
Magnolia Springs, AL
If I were to simply go with the BBR 650-HXR-7005 heavy duty fixed rate springs (6.5 N/mm rate) for the XR/CRF70, I'd use exactly the same spacer, washer and cap as stock. The BBR spring is about 16-1/4" long, so this setup would also add approximately 3/8" of additional preload (7/8" total).
 

Attachments

  • IMG_5796.JPG
    IMG_5796.JPG
    77 KB · Views: 3
  • IMG_5798.JPG
    IMG_5798.JPG
    73.7 KB · Views: 3
  • IMG_5799.jpg
    IMG_5799.jpg
    112.6 KB · Views: 3

Markbxr400

Member
Joined
Mar 15, 2024
Messages
49
Location
Magnolia Springs, AL
Now for the Racing Bros setup.

The kit comes with an antidive valve, a <5" spacer, a washer and aan adjustable preload cap.
The spring is only 10-1/8" long, which would destroy what little travel the bike already has.
The antidive valve is around 3/8" long.
Their email instruction says to reuse the OEM 6" spacer and washer as well.
The adjustable preload cap has the 1/2" of threads like the OEM cap, but then also adds 5/8 to 1-1/8" of additional preload.
If I throw all this in, I get a total component length of 1/2 + (5/8 to 1-1/8) + 5 + 6 +10-1/8 + 3/8 = 22-5/8 to 23-1/8" vs the OEM length of 22-3/8. So I would be adding 1/4-3/4" of additional preload vs OEM setup (approx 3/4 to 1-1/4" total preload).
But I lose about 6" of spring doing this, which is not good for travel.
 

Attachments

  • IMG_5800.JPG
    IMG_5800.JPG
    83.1 KB · Views: 4
  • IMG_5810.jpg
    IMG_5810.jpg
    91.7 KB · Views: 3
  • IMG_5809.jpg
    IMG_5809.jpg
    100.6 KB · Views: 2
  • IMG_5807.jpg
    IMG_5807.jpg
    112.5 KB · Views: 2
  • IMG_5803.JPG
    IMG_5803.JPG
    80.3 KB · Views: 2
  • IMG_5801.JPG
    IMG_5801.JPG
    90.2 KB · Views: 3
  • IMG_5814.JPG
    IMG_5814.JPG
    53.7 KB · Views: 4
Last edited:

Markbxr400

Member
Joined
Mar 15, 2024
Messages
49
Location
Magnolia Springs, AL
Contacted Steady Garage regarding the loss in travel. Their solution was to replace the 5" spacer with an additional 3-1/2" spring (much heavier than the 10" spring) plus a 1-1/4" spacer.

Still, this reduces the original spring length of 15-7/8" with 10-1/8" + 3-1/2" = 13-5/8" of spring, which has to still negatively impact travel, so I'm not too happy with this solution.


So, here's my preliminary plan. Gonna sleep on it tonight. Use the adjustable preload cap, then the 5" spacer, BBR spring and anti-dive valve.

Overall length = 1/2" + (5/8" to 1-1/8") + 5" spacer + 16-1/4" spring + 3/8" valve = 22-3/4 to 23-1/4", adding 3/8" to 7/8" of additional pre-load vs OEM (7/8" to 1-3/8" total pre-load).

This approach should give me a stiffer spring, and anti-dive valve, and additional (and adjustable) preload, while also not reducing travel.

I'm planning to stay with 10 weight fork oil and set the level to 140mm per OEM spec.

I'll try it and go from there. I checked my sag before starting, so will also have something to compare and setup against. I can always go back and cut the 5" spacer down if the preload with the adjuster all the way out is too much)

Any thoughts from the gurus appreciated.

BTW, Here's a pic of the Steady Garage proposed solution with the extra little spring . . . not gonna do it this way . . .
 

Attachments

  • IMG_5813.jpg
    IMG_5813.jpg
    99.4 KB · Views: 6
Last edited:

Kritou

Active member
Joined
Mar 15, 2021
Messages
322
Surely removing the centre stand will make rear wheel removal out on the tail even more “interesting”?
 

Markbxr400

Member
Joined
Mar 15, 2024
Messages
49
Location
Magnolia Springs, AL
Surely removing the centre stand will make rear wheel removal out on the tail even more “interesting”?
Just like the rest of my bikes. . .
I had to pick the bike up higher than the center stand to get the wheel out yesterday. Would have been easier on its side.
Simply trying to give myself as much clearance as possible.
 

dmonkey

Well-known member
Joined
Jul 4, 2021
Messages
2,270
Location
🇺🇸
A trick to that can be to find a way to lift the center stand further. I position the bike over a block of wood and then raise it onto the center stand on top of the wood, or outside I will position the bike so the front tire sits lower in a divot in the ground. That gives a little more clearance for pulling the rear wheel out, which is especially necessary with taller tires. You could also trim the plastic bottom of the rear fender for easier tire removal. Without the center stand, it's easy enough to lay the bike on its side if you don't care about scratches. On other bikes without a center stand I have used a SnapJack opposite the side stand to lift and remove the rear wheel while away from home which works well enough. I just always use my boot to snap the jack into place as there are some reviews of people losing skin pressing it into place with their hands. If you remove the center stand I'd be curious to hear how much it weighs. The farm kitted CT125 in New Zealand ditches the center stand, with benefit of weight savings, ground clearance, less snags, etc. I also have a Honda CT110 where it was common to approach that differently and remove the side stand instead, leaving only the center stand. Definitely a very personal choice as I enjoy regularly making use of both the side stand and center stand on my CT125.
 

Markbxr400

Member
Joined
Mar 15, 2024
Messages
49
Location
Magnolia Springs, AL
More progress today. I installed the spring setup that I mentioned in the last post.

First, after removing the OEM cap, spacer, washer and spring with a telescopic magnet, I compressed each the fork and tied them off with a rope to keep them compressed. I took a wooden dowel with a mark at 60mm and another at 200mm (difference being the 140mm spec), and dipped it into each tube until the 200 mark was flush with the top of the tube. Pulled it out and could get a sense for whether additional oil was needed. Needed a slight amount, so I took my homebrew fork syringe, set the depth (via tie-wrap), added a little oil to each tube and used the syringe to suction it exactly to 140mm.
 

Attachments

  • IMG_5819.JPG
    IMG_5819.JPG
    60.1 KB · Views: 7
  • IMG_5820.JPG
    IMG_5820.JPG
    74.3 KB · Views: 6
  • IMG_5823.JPG
    IMG_5823.JPG
    71.4 KB · Views: 5
  • IMG_5824.JPG
    IMG_5824.JPG
    94.9 KB · Views: 6
  • IMG_5825.JPG
    IMG_5825.JPG
    76.8 KB · Views: 7
  • IMG_5826.JPG
    IMG_5826.JPG
    53.1 KB · Views: 6
  • IMG_5827.JPG
    IMG_5827.JPG
    72.3 KB · Views: 7
  • IMG_5831.JPG
    IMG_5831.JPG
    90.6 KB · Views: 7

Markbxr400

Member
Joined
Mar 15, 2024
Messages
49
Location
Magnolia Springs, AL
Then I took the ropes off and extended the forks. Then I dropped the antidive valves in, then the BBR XR/CRF70 springs, then the OEM washer, then the 5" spacer tubes, then the adjustable preload caps, with no additional preload added. This setup gave me a slightly longer (albeit straight rate) spring, and added about 1/2" of additional preload vs stock.
 

Attachments

  • IMG_5833.JPG
    IMG_5833.JPG
    81.3 KB · Views: 3
  • IMG_5834.JPG
    IMG_5834.JPG
    77.6 KB · Views: 4
  • IMG_5835.JPG
    IMG_5835.JPG
    82.6 KB · Views: 4
  • IMG_5832.JPG
    IMG_5832.JPG
    73.9 KB · Views: 5
  • IMG_5836.JPG
    IMG_5836.JPG
    79.7 KB · Views: 5
  • IMG_5837.JPG
    IMG_5837.JPG
    146.3 KB · Views: 5

Markbxr400

Member
Joined
Mar 15, 2024
Messages
49
Location
Magnolia Springs, AL
Next, I installed the ROXRisers. My point in this was 2-fold:
1. I wanted to bring the bars up and forward in order to improve standing ergonomics.
2. I needed access to the handlebar in between the bar clamps (recall stock mount is a solid piece of metal that does not expose the handlebar in this area) to install a powered Garmin AMP mount for my Garmin Montana 680T GPS.
This turned out to become quite a trick. There is exactly one position that allows the AMP mount, AND allows inserting and removing the key, which is kind of important.
As I was also installing the plug and play USB port, I tied my switched power wiring for the USB also to my GPS (wiring inside the headlight housing - which is tight!)..
 

Attachments

  • IMG_5847.JPG
    IMG_5847.JPG
    136.3 KB · Views: 10
  • IMG_5848.JPG
    IMG_5848.JPG
    81.7 KB · Views: 10
  • IMG_5841.JPG
    IMG_5841.JPG
    65.5 KB · Views: 11
  • IMG_5839.JPG
    IMG_5839.JPG
    130.8 KB · Views: 11
  • IMG_5838.JPG
    IMG_5838.JPG
    66.2 KB · Views: 12

Markbxr400

Member
Joined
Mar 15, 2024
Messages
49
Location
Magnolia Springs, AL
I then reinstalled the front wheel (with the 3.0-17 Shinko). Plenty of clearance side to side. I then installed the high rise front fender. This is pretty tricky. Relocating the horn and wiring loom bracket on the front of the lower triple clamp mount and then mounting the fender, while tight, is doable. However, on the backside of the lower triple clamp, there is a bracket that holds the brake line coming from the ABS module down to the front wheel. I had to remove this bracket, install the fender and then reinstall the bracket. The hose now rides on back side of the frame steering head. It has an additional piece of tubing over the brake like to protect against abrasion. Now that it actually rubs, I may add a second layer of tubing to protect it further.

I also removed the kickstarter lever and put a rubber cap over the shaft to protect against dirt and mud. I'll stick the starter lever in my toolbox in case I should need to reinstall it.
 

Attachments

  • IMG_5843.JPG
    IMG_5843.JPG
    75.3 KB · Views: 15
  • IMG_5845.JPG
    IMG_5845.JPG
    120.2 KB · Views: 16
  • IMG_5851.JPG
    IMG_5851.JPG
    151.9 KB · Views: 15
  • IMG_5854.JPG
    IMG_5854.JPG
    70.3 KB · Views: 14
  • IMG_5855.JPG
    IMG_5855.JPG
    54.8 KB · Views: 14

Markbxr400

Member
Joined
Mar 15, 2024
Messages
49
Location
Magnolia Springs, AL
Pretty well finished most everything needed for my trip today, except still waiting on the master link to replace the chain. The other remaining items can wait.
I removed the top and left side plastics. I ran and zip-tied the extra wire from my Garmin mount under the plastics. Also installed the Battery Tender pigtail, and rain toward the rear along the left side of seat. It's tucked away just under the front of the rear rack. I reinstalled the plastics, then installed the mid-rack. I reinstalled the rear rack (sans the bar that I cut off), and then trial fitted the left side mount and marked where I wanted the GIVI tool box to mount. Took it off, drilled out the holes and mounted it all back up. Looks like it all belongs there. Then I installed the Diablo seat, and the DoubleTake mirrors..
 

Attachments

  • IMG_5861.JPG
    IMG_5861.JPG
    118.6 KB · Views: 12
  • IMG_5866.JPG
    IMG_5866.JPG
    102.2 KB · Views: 11
  • IMG_5864.JPG
    IMG_5864.JPG
    168.7 KB · Views: 12
  • IMG_5862.JPG
    IMG_5862.JPG
    115.7 KB · Views: 12
  • IMG_5867.JPG
    IMG_5867.JPG
    127 KB · Views: 12

Markbxr400

Member
Joined
Mar 15, 2024
Messages
49
Location
Magnolia Springs, AL
Here's the nearly finished project. Rode it about 20 miles today, including a little mild offroad. Front end definitely stiffer and does not bottom out nearly as easy as it did before. Have not adjusted the rear shocks yet, initial sag numbers were pretty good (<30%). When I load it down , I'll adjust the preload. Tires probably added about an inch of clearance. Both tires still touch the ground when on the center stand. With these tires, the speedo is dead on against my GPS. Bars are now better for standing, but could sure go forward another couple of inches vs the pegs - sure wish the footpegs were further back, more underneath me like a regular dirtbike. This feels more like a feet forward cruiser. As easy as it would be to fab a whole new bolt on footpeg setup that would bring the pegs further back, there is just way too much stuff on the bike that would be in the way, so going to nix that consideration for now.
 

Attachments

  • IMG_5877-1.JPG
    IMG_5877-1.JPG
    188.3 KB · Views: 15
  • IMG_5877.JPG
    IMG_5877.JPG
    188.3 KB · Views: 15
  • IMG_5878.JPG
    IMG_5878.JPG
    178.6 KB · Views: 15
  • IMG_5880.JPG
    IMG_5880.JPG
    170.7 KB · Views: 18
  • IMG_5884-1.JPG
    IMG_5884-1.JPG
    205.1 KB · Views: 20
  • IMG_5885-1.JPG
    IMG_5885-1.JPG
    207.8 KB · Views: 20
  • IMG_5886.JPG
    IMG_5886.JPG
    188.9 KB · Views: 18
  • IMG_5889.JPG
    IMG_5889.JPG
    200.7 KB · Views: 16

Markbxr400

Member
Joined
Mar 15, 2024
Messages
49
Location
Magnolia Springs, AL
428VX master link arrived today, so x-ring chain now installed. I have an older Moose Racing rear adventure bag. Looks like it was tailor made for the rack on this bike. Semi soft luggage that comes off and can be used like a semi soft suitcase. Expands to about twice the height shown in the pic. Has lots of anchor points for tying off tents, sleeping bags, etc. I think I can nudge it over to the exhaust side, and put a tool bag, air mattress, fuel bottle, etc along side the Moose bag.
 

Attachments

  • IMG_5944.JPG
    IMG_5944.JPG
    165.1 KB · Views: 10
  • IMG_5946.JPG
    IMG_5946.JPG
    129 KB · Views: 10
  • IMG_5947.JPG
    IMG_5947.JPG
    150.8 KB · Views: 10

Markbxr400

Member
Joined
Mar 15, 2024
Messages
49
Location
Magnolia Springs, AL
BTW, use a garbage bag liner in the Moose bag. I used it on a solo adventure ride at the tippy top of the Michigan UP when this happened (log under water that caused me to flop the bike). Everything in the bag was a muddy mess!
 

Attachments

  • F10AE44E-ECD2-435B-A604-AC636C1C96DE.jpeg
    F10AE44E-ECD2-435B-A604-AC636C1C96DE.jpeg
    162.3 KB · Views: 17

wjl144

Member
Joined
Feb 28, 2024
Messages
28
Location
PA
As I was also installing the plug and play USB port, I tied my switched power wiring for the USB also to my GPS (wiring inside the headlight housing - which is tight!plug and play USB

Do you have a link to the "plug and play" USB port you used? I'd love to add one to mine but everyone I've found had feedback saying it wasn't plug and play on our 24s.
 
Top