What's new
Honda Trail 125 Forum

Welcome to the Honda Trail 125 Forum! We are an enthusiast forum for the Trail 125, Hunter Cub, CT125 or whatever it's called in your country. Feel free to join up and help us build an information resources for this motorcycle. Register a free account today to become a member. Once signed in, you'll be able to participate on this site by adding your own topics and posts, as well as connect with other members through your own private inbox!

Removing the rear brake fluid cover / "Trail 125" plastic cover on the right side.

bay125er

New member
Joined
Jan 25, 2021
Messages
21
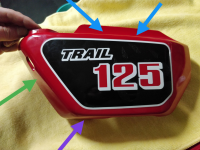
Some of the plastics on this bike can be a bit tricky to remove so I figured I would outline where the clips and fasteners are for this piece.
1612038127705.png


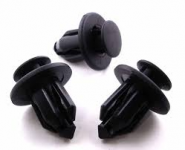
Purple: A center push button rivet/clip similar to this:
1612038308329.png
Push in the center and then pull the whole thing out.

Green: Screw, phillips.

Blue: Clips. be very careful with this section. I was unsure of the direction to remove them so I worked very slowly and even used a plastic iphone opening tool (lol) to pop them out. Remove the above first.

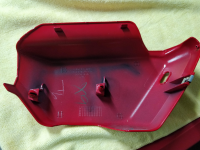
Here is a back view:
1612038382008.png

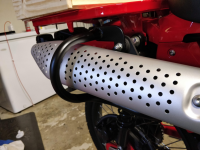
Why did I remove it? To install this.
1612038558261.png
 

bay125er

New member
Joined
Jan 25, 2021
Messages
21
Good info, I like the pipe guard, I've been looking at them.
Yeah I figured I would get one after I saw the price of a new OE pipe. It's current price is $824.73! The heat shield would protect and hide cosmetic damage though, but that is still close to $150.
 

Msfitoy

Well-known member
Joined
Jan 13, 2021
Messages
513
Location
NC
Some of the plastics on this bike can be a bit tricky to remove so I figured I would outline where the clips and fasteners are for this piece.

View attachment 216


Purple: A center push button rivet/clip similar to this:
View attachment 217
Push in the center and then pull the whole thing out.

Green: Screw, phillips.

Blue: Clips. be very careful with this section. I was unsure of the direction to remove them so I worked very slowly and even used a plastic iphone opening tool (lol) to pop them out. Remove the above first.

Here is a back view:

View attachment 218

Why did I remove it? To install this.

View attachment 219
Super awesome...I'm glad you posted this as I have the same part coming =)
 

Lostagain

Member
Joined
Jan 25, 2021
Messages
45
Location
SE Virginia, USA
Thanks! As a general rule it's all too easy to break the tabs off plastic motorcycle bits....and expensive. I'll be extra careful with those two on top. Seeing the price of the OEM exhaust suddenly makes me want one of those guards.

Lostagain
 

Lostagain

Member
Joined
Jan 25, 2021
Messages
45
Location
SE Virginia, USA
I just removed the cover. It's super easy....until you get to those two clips at the top. The trick is to pivot the lower part of the plastic cover up as much as possible, then pry the two clips out. It felt like I was breaking something, took considerable force, but they finally let go. I put a good coat of lithium grease on the parts that push into rubber grommets and the whole cover went back in place very easily. Still hard to remove those clips when I tried it again. Note that most 'Phillips' head screws on Japanese motorcycles are really JIS (Japanese Industrial Standard). A Phillips will work on the easy ones but if you find a screw that is difficult it's time to use a JIS screwdriver rather than damage the head. It's worse when the screw is going into an aluminum block. You can guess how I know.
 

JS45

Member
Joined
Jan 25, 2021
Messages
55
Location
Jax Beach, FL
Let us know which is best! Thabks


Also great forum here glad the negativity from other forums hasn’t found its way here this community has been nothing but positive and nothing but help which is how a forum should be! Thanks everyone I really appreciate it!
 

Lostagain

Member
Joined
Jan 25, 2021
Messages
45
Location
SE Virginia, USA
I'm using a less expensive JIS set: $18 from Amazon. Interchangable bits are great for an on-the-road kit but not in my shop (where I'd lose track of the handle). With that said, Vessel makes great tools.
 

G19Tony

Well-known member
Joined
Jan 24, 2021
Messages
800
Location
Las Vegas, NV
Some of the plastics on this bike can be a bit tricky to remove so I figured I would outline where the clips and fasteners are for this piece.

View attachment 216


Purple: A center push button rivet/clip similar to this:
View attachment 217
Push in the center and then pull the whole thing out.

Green: Screw, phillips.

Blue: Clips. be very careful with this section. I was unsure of the direction to remove them so I worked very slowly and even used a plastic iphone opening tool (lol) to pop them out. Remove the above first.

Here is a back view:

View attachment 218

Why did I remove it? To install this.

View attachment 219
I just received mine last night. I'll be installing it today.
 

Dutchess2

New member
Joined
Mar 22, 2021
Messages
1
Even being really careful, I managed to break both of the top tabs off. I guess this really is a CT afterall because I will have to put red duct tape or a bungie cord to hold it on. Lol.
 
Top