What's new
Honda Trail 125 Forum

Welcome to the Honda Trail 125 Forum! We are an enthusiast forum for the Trail 125, Hunter Cub, CT125 or whatever it's called in your country. Feel free to join up and help us build an information resources for this motorcycle. Register a free account today to become a member. Once signed in, you'll be able to participate on this site by adding your own topics and posts, as well as connect with other members through your own private inbox!

Tire Change - Seating the Bead

Bombadier36

Member
Joined
Nov 29, 2021
Messages
16
Location
Pensacola, FL
I’m looking to do a camping trip off the CT125 and have a question regarding tire emergencies on the route.

Is it possible to seat the bead of the tire with a small hand pump? On the bigger bike I wouldn’t even think of trying but with the smaller tires, I’m wondering if it’s possible. Trying to find an answer without running a test at the house.
 
  • Like
Reactions: Tim

AZ7000'

Well-known member
Joined
Jan 28, 2021
Messages
980
Put 30-40 psi and ride it, if a part doesn’t seat spit on it (or any fluid of your choice), ride it then go down to 24psi ir whatever you ride at.
Should be easy enough!
 

dmonkey

Well-known member
Joined
Jul 4, 2021
Messages
2,234
Location
🇺🇸
Yes, should work fine since it's a tubed tire and you're not fighting with escaping air. If you have trouble seating it you can tie a rope around the circumference of the tire to squish it a bit which will seat easier. Tire mounting paste will help it seat easier, you can repackage some into a travel container. I also recommend bringing a bunch of zip ties, if you're mounting the tire by hand, using the zip tie method makes it easier and reduces the risk of puncturing the tube with a spoon while mounting the tire.
 

SneakyDingo

Well-known member
Joined
Aug 6, 2021
Messages
1,573
using the zip tie method makes it easier and reduces the risk of puncturing the tube with a spoon while mounting the tire.
I'm new to this: what's the zip tie method? Zip ties radially around the tube and tire, mount on rim to prevent pinch flats, then cut the zip ties?
 

dmonkey

Well-known member
Joined
Jul 4, 2021
Messages
2,234
Location
🇺🇸
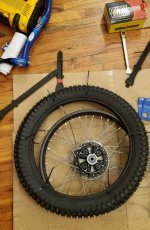
You tuck the tube, partially inflated, into the tire and then zip tie the tire closed before spooning it onto the rim. Zip ties every 6inch or so starting at the valve stem. It limits how much of the tube can possibly be exposed to the spoons when putting it on, and mostly eliminates the possibility that you jab the tube.

tirechange.jpg
 

Kritou

Active member
Joined
Mar 15, 2021
Messages
317
You tuck the tube, partially inflated, into the tire and then zip tie the tire closed before spooning it onto the rim. Zip ties every 6inch or so starting at the valve stem. It limits how much of the tube can possibly be exposed to the spoons when putting it on, and mostly eliminates the possibility that you jab the tube.

View attachment 1886
Looking at that photo I’m unsure where and how the tube’s valve stem is put through the rim?
 

SneakyDingo

Well-known member
Joined
Aug 6, 2021
Messages
1,573
Looking at that photo I’m unsure where and how the tube’s valve stem is put through the rim?
It wouldn't be a perfect seal between the beads, so you could probably just take a looksy in and see where the valve stem is.

On bicycles you can always tell if someone who's a mechanic or paying attention to detail did the work - the tube will always line up with the tire's logo or label. There is a functional reason for this - in the event of a flat, you can find the puncture, and then use the tire label to orient the tube relative to the tire and quickly find the spot on the tire for where you need to more closely inspect for damage or debris. I dunno if that's what mechanics actually do, but there's nothing stopping someone from repeating this on a motorcycle tire for the same reason.

Bonus trivia: On bicycles not only will the valve stem line up with the logo on a tire, the logo on the hub will also line up with the valve stem hole on the rim on professionally built wheels (so with the tire off, if you look through the valve stem hole at the hub, you'll see the logo)
 

dmonkey

Well-known member
Joined
Jul 4, 2021
Messages
2,234
Location
🇺🇸
Yep, in the photo I've got a valve stem puller attached if you look at around the 11-o'clock position on the tire. It doubles as a valve core removal tool. Mine is a Moose Racing 3-Way Valve Core Tool. On motorcycle tires there is a dot inked onto most new tires that indicates the lightest spot on the tire, when you fit the tube you want the valve stem to sit inside at that dot so its extra bit of weight helps balance out the weight differences. These Shinko SR241s have the dot, it must just be on the other side of the tire in the photo.
 

Kritou

Active member
Joined
Mar 15, 2021
Messages
317
Thank you, every day is a school day

Can we now move on to the issue of how the external nut should be installed on the valve thread!!
 

dmonkey

Well-known member
Joined
Jul 4, 2021
Messages
2,234
Location
🇺🇸
There's a thread on that here:

If you walk into most Honda dealerships you'll see them tightened hard against the rim. I run mine loose against the rim. If you're airing down the tires then you'll want to back it off against the valve stem cap. If you encounter any significant tire slippage it won't save your tube, you need a rim lock to address that.
 

AZ7000'

Well-known member
Joined
Jan 28, 2021
Messages
980
Thank you, every day is a school day

Can we now move on to the issue of how the external nut should be installed on the valve thread!!
Yes on, maybe 5mm or so off the rim? I sometimes tighten it against the plastic valve cap to lock it in place. Really handy to fill an empty tube...
 

tuff tunica

New member
Joined
Nov 29, 2021
Messages
10
You tuck the tube, partially inflated, into the tire and then zip tie the tire closed before spooning it onto the rim. Zip ties every 6inch or so starting at the valve stem. It limits how much of the tube can possibly be exposed to the spoons when putting it on, and mostly eliminates the possibility that you jab the tube.

View attachment 1886
I've not tried this ZIp-Tie method. Looks like it would also help in keeping the tire from pushing higher onto the bead for that finale section. I know that often on my other bikes with tubeless tires keeping the mounted section off the bead can sometimes be a PITA. On my tubed tires I've always been taught just begin mount 180 from the valve stem. The valve helps hold the tube in position and reduces the chance of the tube migrating out and pinching.
 

wadoii

New member
Joined
Jul 9, 2023
Messages
4
To initiate the disengagement of the beads responsible for the structural attachment between the wheel and tire, a calculated application of force is requisite. This underscores the necessity for the implementation of a tire iron. Commence the procedure by addressing the initial bead and iterate sequentially until the rim achieves comprehensive detachment. Upon flipping the wheel, replicate the identical protocol on the opposing flank. Subsequent to this stage, the dispersion of tire lubricant in the vicinity of the beads is advised, thereby expediting the facile demounting of the tire from the rim.
 
Last edited:

dmonkey

Well-known member
Joined
Jul 4, 2021
Messages
2,234
Location
🇺🇸
My experience with the OEM IRC GP-5, Shinko SR241, and IRC TR-1 tires on the CT125 is that none of them require a tire iron to break the bead away from the rim. Once you've pulled the valve core to deflate the tube you can just press on the tire by hand to unseat the tire bead from the rim. Haven't personally been able to remove the tire from the rim without the use of 2 tire irons though.
 

Kritou

Active member
Joined
Mar 15, 2021
Messages
317
My experience with the OEM IRC GP-5, Shinko SR241, and IRC TR-1 tires on the CT125 is that none of them require a tire iron to break the bead away from the rim. Once you've pulled the valve core to deflate the tube you can just press on the tire by hand to unseat the tire bead from the rim. Haven't personally been able to remove the tire from the rim without the use of 2 tire irons though.
I’m speaking out of ignorance here, but if the tyre’s beads are zip tied together once the bead is broken is it possible that the tyre can then be located into the wheel well to allow clearance for the zipped beads to slide over the rim at the opposite side?
 

dmonkey

Well-known member
Joined
Jul 4, 2021
Messages
2,234
Location
🇺🇸
I’m speaking out of ignorance here, but if the tyre’s beads are zip tied together once the bead is broken is it possible that the tyre can then be located into the wheel well to allow clearance for the zipped beads to slide over the rim at the opposite side?
I'm not positive that I'm visualizing what you are saying correctly, but if in this scenario you are using the zip tie method to remove rather than install the tire I think it would be extremely difficult to get the zip ties placed and tuck the tube in without pinching it while already on the rim. I have only used that method for installation. And once you do have the tire zip tied with both beads pinched together and the tube inside, it still requires spoons to work it over the lip of the rim. Positioning the tire so one side is in the drop center of the wheel and pulling the opposite side over the lip of the rim still requires tire spoons from my experience, if that's what you are asking.
 

Kritou

Active member
Joined
Mar 15, 2021
Messages
317
Sorry about that - I’m not very familiar with tubed tyres on the CT as I went semi-tubeless from day one which makes threading zip ties through fairly easy. For installation however, including tubes, I would like to think that the tricks in that YT video you introduced us to using a garbage bag, tyre warming etc might give us lever free installations - after all, if it is good enough for a Model T a CT must be a piece of piss!

 
Top