What's new
Honda Trail 125 Forum

Welcome to the Honda Trail 125 Forum! We are an enthusiast forum for the Trail 125, Hunter Cub, CT125 or whatever it's called in your country. Feel free to join up and help us build an information resources for this motorcycle. Register a free account today to become a member. Once signed in, you'll be able to participate on this site by adding your own topics and posts, as well as connect with other members through your own private inbox!

Manual Clutch Conversion?

m in sc

Well-known member
Joined
Feb 2, 2021
Messages
2,512
Location
Rockhill, SC
I had the auto clutch for 2 years, got tired of it, changed it (the hard way) and do not regret it for a second. the auto clutch adds mechanical complexity as well. now, on my wife's supercub, to me , makes way more sense. I have 12 bikes, and they all now have a full manual clutch. tbh, the xr150l I have is very comparable. and, overall a better bike in pretty much every way.
 

Eury

New member
Joined
Jul 12, 2023
Messages
9
EX: Monkey , TW200....or Royalenfield?
View attachment 7497

I own the Monkey and TW, neither are similar. The Trail is unique with the step through style, big rack, upright seating, center stand, and looking the way it does. That Enfield isn’t even close to the same type bike. Spending $230 to make the clutch controllable by a lever while still keeping he centrifugal operation when stopped makes the bike perfect for what I want and cheap to do it too.
 

vintagegarage

Well-known member
Joined
Jan 14, 2021
Messages
213
Location
Florida
Hibari posted a video yesterday about his Takegawa Hydro Clutch Kit installation. He uses a different master cylinder. His video already has over 5,000 views in one day, so there is some interest in this. Using Google translate on his description field, I get:

"Takegawa's clutch conversion kit, which I didn't understand very well. I didn't feel any inconvenience with the centrifugal clutch, but I heard that you can use a half clutch at the start.
I can't stay even if I stay or stand, and I immediately pounce.

For the clutch levers, I purchased a Brembo Corsa Corta to match the F brake. Along with this, the banjo bolts and brake hoses were also changed. I bought it thinking that even though I was spending a lot of money, I was pursuing self-satisfaction.

This is an installation video.

Takegawa clutch conversion kit

Brembo Corsa Corta clutch lever
https://koh-ken.jp/blog/originalparts/2021/08/05/20210805/"


Here is the video:
 

m in sc

Well-known member
Joined
Feb 2, 2021
Messages
2,512
Location
Rockhill, SC
as an addendum, especially in light of the 1st set of pictures just vanishing, I'll give an update on how i did mine and what i looked like. I went into it over the weekend because i was getting a slight slipping if i aggressively shifted on occasion. and i just wanted to check see how it was doing.

crash bar swing forward and out of way, foot peg bar taken out. already had drained oil:


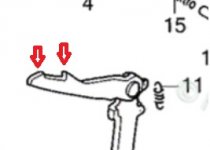
pulling the bearing out. few things here to note. 1: the most obvious being the flywheel, no longer the auto clutch. this came from motogaga for the wave 125 conversion they sell. while it fit the shaft and the primary gear is fine, etc, note 2 things. 1" the oil hole in the crank that would normally feed the spinner cavity is exposed. I mentioned this above. To rectify this, I drilled out the brass ball in the crank and sleeved the passage with a 6mm od x 3mm id aluminum sleeve to allow oil to pass thru. this is what oils the top-end. IF this was left open the top-end would never get oil. 2: I had to add a 'notch' for the lock tab washer to have something to grab onto, you can see it in the spline area.


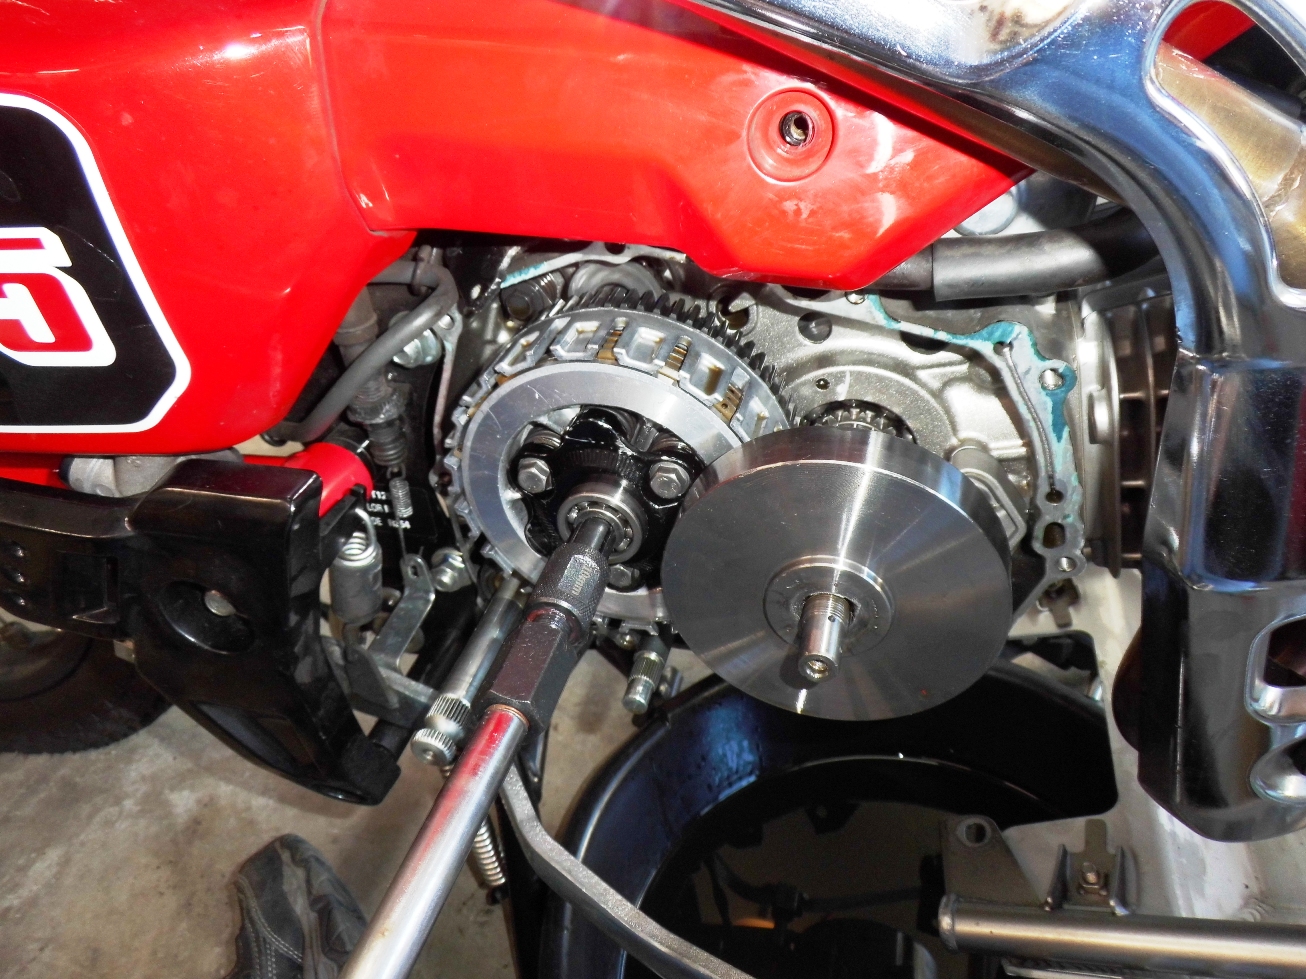
you can see the crank end here as well. note: the clutch assembly and spinner need to go on at the same time. the pint behind this was to set the clutch pack on, and then tighten the pressure plate bolts down with it aligned . you can also see the 'inlet' oil spinner galley hole at the crank splines and the 'outlet' hole further down the shaft as seen above.


i had a few variants of stock and aftermarket clutch parts leftover from the grom stuff, and found this pressure plate backing hub that was a bit thicker on the main plate, but the studs were the same length. this will help preload the clutch discs at rest to give better grip. the stock ct one was about the same as the one on the right. the ct also uses less clutch discs than the grom motors, so you're working with 20% less, which is doable but creates an interesting challenge with the flywheel (and stock centrifugal clutch) reducing the clearance to the clutch basket. (and why i didn't just run a 5 or 6 disc basket).


while i had it out, i took about 12mm off the flywheel, seemed a bit excessive as big as it was. def revs a tad quicker now.


here it is bolted back together. note the bearing is offset out (as it was before) to clear the clutch hub nut due to the shallower basket AND smaller ID required by the grom cover i used.


also installed some aftermarket diamond pattern clutch steels and new frictions i had (takegawa i think? had em forever) and test rode it yesterday, def better. I had well over 1200 miles on the man ual cluthc setup before i went in and it did work well.

and yes, this is hand's down the most convoluted and complicated way to do it, so i don't recommend it. But i do like how it works. IMHO better than welding up the auto clutch of doing a grom crank or lower end swap. (which i do have one and might build a 186 down the road).
 

Es89

New member
Joined
Aug 30, 2023
Messages
15
yes, the auto clutch will absolutely still be functional. Im considering getting this since my auto clutch is no more, and only because its kind of trick. in the fall i plan on taking the cover back off and trimming down the flywheel spinner on the lathe so i can, if i want, fit a 6 disc clutch and make a bushing to tighten up the shifting arm engagement to the shift drum on mine. For some unknown reason, ALL the pics i took of the internals of the motor when i did mine went poof and i cant find them anywhere. 🤷‍♂️
Where are you going to put the bushing for the shift drum? Where the brake was on the semi auto?
 

m in sc

Well-known member
Joined
Feb 2, 2021
Messages
2,512
Location
Rockhill, SC
the 'brake' for the outer auto clutch flywheel was on the shift linkage arm. as far as the 'bushing', i think i'll actually need to weld up the arm that grabs the shift drum or maybe use one for a grom. it allows extra play, which on an auto clutch gives the extra travel it needs to 1st push in on the clutch, then shift the gear. I rode it yesterday, and didnt think about it. but it does have a lot more play than i think it should have. these 2 points need to be in closer to each other equally.
 

Attachments

  • shift-arm.jpg
    shift-arm.jpg
    10.1 KB · Views: 3

Es89

New member
Joined
Aug 30, 2023
Messages
15
Comparing it to the Grom the trail is separate from the shifter shaft from what I can see do you think that may be where the slop comes from?
 
Top