What's new
Honda Trail 125 Forum

Welcome to the Honda Trail 125 Forum! We are an enthusiast forum for the Trail 125, Hunter Cub, CT125 or whatever it's called in your country. Feel free to join up and help us build an information resources for this motorcycle. Register a free account today to become a member. Once signed in, you'll be able to participate on this site by adding your own topics and posts, as well as connect with other members through your own private inbox!

#2425 doing maintenance, probably like an idiot

BoonDonkey

Member
Joined
Mar 9, 2024
Messages
26
Location
Las Vegas, Nevada
Odometer: 10,100 mi

Maintenance updates:
Steering Head Bearings (I dunno what they're called) brought back within spec

I suspected my bearings were not under the right tension, because if it were a bicycle I'd feel the same sensations. Gonna copy-pasta this from the other thread because lazy.

My point for following up on this was that last night, the 29mm socket arrived from Amazon.
  • 6mm Hex key to undo the 4 bolts on the handlebar mount, torque spec 27 Nm (3-24 service manual, note tightening order), and the upper pinch bolts on the forks, torque spec 29 Nm. (3-22)
  • 17mm socket to undo the fork caps, torque spec 22 Nm. (3-23)
  • 29mm socket to undo the steering stem nut on the top, torque spec 88 Nm. (3-25)
  • Ref: Steering Head Top Nut torque spec is to be initially tightened to 27 Nm. (3-25)
Officially what you're supposed to do is take that tool @dmonkey linked to, remove the upper triple clamp, torque it to 22 Nm and then put everything back together again. Unofficially I took my hook wrench, lifted the clamp up 3/4 of the depth of the clamp, and very carefully tightened the steering stem headrace nut. I tightened it to what I thought was roughly the correct spec and checked for handlebar flop to either side.

My expectation was that the bearings should bind very, very slightly such that the wheel will not flop over immediately if you lift the front wheel off the ground by pressing the rear wheel down to the ground (sit on the rack), tilt the front wheel slightly to the side, and then bang the seat hard with your fist. This isn't a very scientific test but it's generally indicative of whether the bearings have been overtightened if you're used to what in spec looks like. Like a couple of good whacks, sure, but that first one shouldn't be enough, it should move slightly but not flop completely over to me. Before I started, having it slightly off to the side and doing the ol' seat whack while the wheel was in the air was enough to make it flop. I tightened it until I got to the point where I think it's within spec and called it good.

This morning I rode to work, trying to hit all the undulations that would normally unload the front to generate that wobble I was familiar with. No wobble. Then I hit a couple of manhole covers that were generating a clunk before. No clunk. Looks like the problem for me at least was the tolerance was out of spec.


This is from post #68. I want to thank @Sneaky Dingo for the information and inspiration. I have been complaining about what I thought was non-existent fork rebound damping, e.g. a noticeable clunk on fork rebound when going over bumps. I also had the condition of the front end flopping over when putting the bike on the center stand. I previously tightened then steering stem top nut (the chrome piece) but that had no effect. At the time I didn't have the gumption to dismantle the triple tree assembly. Now I've done the job properly. It's not difficult but my application was complicated slightly be the installed Honda front rack, which attaches to the triple tree. That had to be removed in order to remove the triple tree. I have a collet wrench that fits the steering head bearing lock nut which made the adjusting easy. The nut was loose enough that I could tighten it half a turn with just the stubby wrench. The wrench accepts a 3/8 ratchet handle for applying more torque. I torqued it until the front end turned easily without flopping. This adjustment has reduced both the flop and the "rebound clunking". Both actions are now within acceptable range.

Thanks again,
BoonDonkey
 

SneakyDingo

Well-known member
Joined
Aug 6, 2021
Messages
1,720
Half a turn is a lot, considering it's supposed to be really snug. I'm glad the instructions helped!
 

SneakyDingo

Well-known member
Joined
Aug 6, 2021
Messages
1,720
Odometer: 17,275 mi (will add later)
Maintenance: Replace battery

I left my lights on and walked away without noticing one too many times and lately it's been having a hard time starting. When I saw the Tusk Lithium Pro Battery TLFP-7L battery was "on sale", I decided it was time to buy one. Now, the process for this isn't terribly difficult, but it did culminate in a cautionary tale that is related to this (IYKYK):

20241103_234503848_iOS.jpg

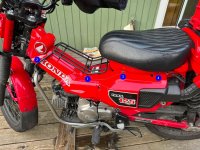
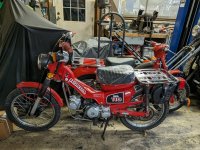
But to tell you why, we'll have to go back to the beginning. First off, my bike has the center carrier so my fat foot doesn't leave marks on the top. It looks like this on an average day:

20241104_000036349_iOS.jpg

To get at the battery, you undo the bolt at (1) - 5mm Hex, the two bolts at (2) - 6mm hex, remove the carrier, then pop out the push pin at (3). Once that's out, lift up the battery cover by working your way around, being mindful of the phat hook on the back right. Maybe give it a lil WD40 spray right near the (1) to loosen the tab there. THAT part went fine.

The problem came when I went to install the battery. The Tusk battery has these two brass connectors that screw to the battery. I wanted to connect some pigtails that run along the snorkel near (3) and out the back. The wiring is pretty tight, so I needed to remove the pushpin at (4) and also the bolt to the bottom right of the (1) - 5mm hex to pull the cover off.

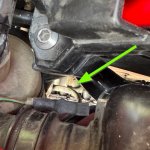
Once that was all loosened up, I disconnected the brass caps, and of course I proceeded to immediately drop one of those little suckers down into the engine space. It decides to go nice and deep where my XL gloved hands can't reach. Being brass, I can't use a magnetic pickup to grab it.

20241103_233047403_iOS.jpg20241103_233207639_iOS.jpg

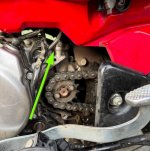
Off comes the cover for the countersprocket bolts (deep 8mm socket), off comes the cover, I reach in, grab the brass bit, and realize I have now removed a center carrier, 3 panels, a battery harness, 8 bolts (2 of them being the battery holder bolts themselves), and 2 push pins just to install the battery. On anyone else's bike that would have been 1 pushpin, a cover, a battery harness and 3 bolts.

Well, nothing ventured nothing gained, on goes the brass bits, Sparky the Electric Screwdriver making short work of a lot of the screwing. Aside from connecting everything, packing it nicely in and before I do anything starting the bike and making sure it actually starts... reinstallation is the reverse. Countersprocket cover on. 2x bolts (8mm socket) in. On goes the air filter cover. On goes the battery cover. In goes the bolts for the carrier, the bolt through the battery cover and the bolt for the air cover. Finally, bike is almost completely back together and.......

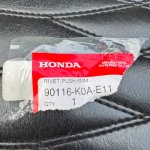
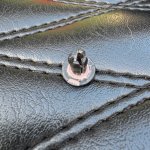
20241103_232637927_iOS.jpg

Where's the middle pin?

Try as I might (and I didn't might very hard) I can't locate the pin.

A long time ago, @dmonkey convinced me that I needed more push rivets in my life. So I bought 10, put them in my kit, and thought nothing of it. Well, I've finally come to the point where I've actually used one. Thanks @dmonkey. Reached into my kit, pulled out a fresh one, installed it and went on with my life.

New battery is installed. Seems to work fine. Seems smaller than the original. I'm wondering if I'll need to add a little fabric or something to stop it from jostling around. I'm going to take it for a test ride first before I make that decision though.
 
Last edited:

drjon533i

Active member
Joined
Aug 4, 2024
Messages
95
Location
Liberal, KS
Odometer: 10,100 mi

Maintenance updates:
Steering Head Bearings (I dunno what they're called) brought back within spec

I suspected my bearings were not under the right tension, because if it were a bicycle I'd feel the same sensations. Gonna copy-pasta this from the other thread because lazy.

My point for following up on this was that last night, the 29mm socket arrived from Amazon.
  • 6mm Hex key to undo the 4 bolts on the handlebar mount, torque spec 27 Nm (3-24 service manual, note tightening order), and the upper pinch bolts on the forks, torque spec 29 Nm. (3-22)
  • 17mm socket to undo the fork caps, torque spec 22 Nm. (3-23)
  • 29mm socket to undo the steering stem nut on the top, torque spec 88 Nm. (3-25)
  • Ref: Steering Head Top Nut torque spec is to be initially tightened to 27 Nm. (3-25)
Officially what you're supposed to do is take that tool @dmonkey linked to, remove the upper triple clamp, torque it to 22 Nm and then put everything back together again. Unofficially I took my hook wrench, lifted the clamp up 3/4 of the depth of the clamp, and very carefully tightened the steering stem headrace nut. I tightened it to what I thought was roughly the correct spec and checked for handlebar flop to either side.

My expectation was that the bearings should bind very, very slightly such that the wheel will not flop over immediately if you lift the front wheel off the ground by pressing the rear wheel down to the ground (sit on the rack), tilt the front wheel slightly to the side, and then bang the seat hard with your fist. This isn't a very scientific test but it's generally indicative of whether the bearings have been overtightened if you're used to what in spec looks like. Like a couple of good whacks, sure, but that first one shouldn't be enough, it should move slightly but not flop completely over to me. Before I started, having it slightly off to the side and doing the ol' seat whack while the wheel was in the air was enough to make it flop. I tightened it until I got to the point where I think it's within spec and called it good.

This morning I rode to work, trying to hit all the undulations that would normally unload the front to generate that wobble I was familiar with. No wobble. Then I hit a couple of manhole covers that were generating a clunk before. No clunk. Looks like the problem for me at least was the tolerance was out of spec.
Since new, my bike has had the "clunk" SneakyDingo wrote about, so yesterday I performed the procedure he outlined. I have a few helpful tips that may help others that want to do this procedure, and a question.

1) I found a 6 point 29 mm socket from Autozone for $6. Part # 27291 My local store had it in stock.

2) If you have previously reversed (rotated) the lower handle bar mounts, you do not have to remove the handlebars to remove or tighten the Steering Stem Nut. If not, this would be a good time to do it.

3) To tighten the Steering Head Top Nut, the Service Manual says (I'm paraphrasing here):
a) Initially tighten the Steering Head Top Nut to 27 Nm (= 20 ft-lb).
b) Turn the steering stem lock to lock several times to seat the bearings.
c) Completely loosen the nut.
d) Then tighten "fully by hand".

My question here is, what the hell does "fully by hand" mean????

4) I got about 1/2 turn on the lock nut before it got to approx. 20 ft-lbs

5) This procedure seems to have helped, but not totally eliminated, the clunk when going over sharp bumps for me.
 

SneakyDingo

Well-known member
Joined
Aug 6, 2021
Messages
1,720
I assumed it meant "grabbing the nut with your hand and twisting it as hard as you can". Keep in mind: The world's finest mechanical wheelbarrow may not need the world's finest torque wrench instructions here,

I think just... choose a value and roll with that. I chose like... 15 Nm.
 

drjon533i

Active member
Joined
Aug 4, 2024
Messages
95
Location
Liberal, KS
I assumed it meant "grabbing the nut with your hand and twisting it as hard as you can". Keep in mind: The world's finest mechanical wheelbarrow may not need the world's finest torque wrench instructions here,

I think just... choose a value and roll with that. I chose like... 15 Nm.
I may need to go back in and back the nut off a little. I tightened it approx. 15 ft-lbs then test drove it. Still had some "clunk", So I went in and tightened it to approx. 20 ft-lbs. Didn't help any. I am wondering if the "clunk" sound is coming from the fork springs banging against the tubes.
 

SneakyDingo

Well-known member
Joined
Aug 6, 2021
Messages
1,720
For me "too tight" was the handlebars would no longer flop to the side (was binding). So if I had it tight enough, it wasn't binding but just barely, and I still got a clunk, I assumed that the clunk came from somewhere else.

I still get a clunk, but only when I kind of expect it, like me vs. tree root at 30 mph.
 

drjon533i

Active member
Joined
Aug 4, 2024
Messages
95
Location
Liberal, KS
For me "too tight" was the handlebars would no longer flop to the side (was binding). So if I had it tight enough, it wasn't binding but just barely, and I still got a clunk, I assumed that the clunk came from somewhere else.

I still get a clunk, but only when I kind of expect it, like me vs. tree root at 30 mph.
Read your post about that before I started working on this. Even after tightening to about 20 ft-lbs, it would still flop over. Didn't want to go any higher. The bearings need a little play in them, kind of like a wheel bearing, so I backed the nut off a little yesterday. Glad I did the procedure though, as the bearings were definitely too loose to begin with.
I haven't checked the fork oil level, but suspect that it is low like others have found, allowing the springs to knock against the tubes. Planning on changing it out this weekend with YSS 15w. Service Manual says 120 cc plus/minus 2.5 cc. While I'm working on the forks, will also be aligning the top of the fork tubes with the top triple clamp. They both stick up about 1/8". Manual says flush. Will let you know the results.
 

dmonkey

Well-known member
Joined
Jul 4, 2021
Messages
2,915
Location
🇺🇸
Go by fork oil level in addition to volume because even after flushing some oil is likely to remain in each leg.
 

SneakyDingo

Well-known member
Joined
Aug 6, 2021
Messages
1,720
Service Manual says 120 cc plus/minus 2.5 cc. While I'm working on the forks, will also be aligning the top of the fork tubes with the top triple clamp. They both stick up about 1/8". Manual says flush. Will let you know the results.

Considering my experience with changing engine oil and the amount of oil being arbitrary, I let my source of truth be the 140mm from the top regardless of the amount and sucked out the excess (3-23 of the service manual).

The number of times I've undone and retightened those 29 Nm pinch bolts...
 

drjon533i

Active member
Joined
Aug 4, 2024
Messages
95
Location
Liberal, KS
Go by fork oil level in addition to volume because even after flushing some oil is likely to remain in each leg.
Considering my experience with changing engine oil and the amount of oil being arbitrary, I let my source of truth be the 140mm from the top regardless of the amount and sucked out the excess (3-23 of the service manual).
I did think about that, and considered flushing the fork with solvent, but nixed that idea as it may harm the seals, and not dry out completely leaving some residue.
I may blow the tubes out with low pressure compressed air though just to see how much oil comes out.

The number of times I've undone and retightened those 29 Nm pinch bolts...
Like Bill Clinton once said: "I feel your pain!"
 

SneakyDingo

Well-known member
Joined
Aug 6, 2021
Messages
1,720
Odometer: 19,500'ish mi

Latest maintenance:
  • Air, oil, chain maintenance. Really nothing much. Haven't even had to adjust the clutch recently. Currently planning my next batch of purchases to group together for the Memorial day sales.
  • Did the fork oil. Took me a while to remember to use WD40 on the clamps and when I did, they slid right out. Overall process took about 1.5 hours from start to end, including finding my tools and cleaning up after. No spare parts discovered at the end of it. My life circumstances changed slightly so now I have some disposable income, and used some of that to buy those graduated measuring cups which is vastly superior to the zip tie method.
  • The Michelin City Extra tires now have 4900 mi on them if my logging is accurate. Still going great, the back one is squaring off but still has plenty of tread, and the front is in such good condition I'll likely buy only one new tire and put it on the back. They are still pretty slippery in the wet compared to the SR244's, but in the dry they're great. With their wear and tear that I'm seeing, I think it would be completely viable to run SR241's during winter for that extra grip even though they're less durable, and then the City Extra tires 3 seasons if you didn't have any off road adventure plans. I fully expect to get a solid 7k miles out of these based on the current wear and tear, and I maintain they feel like a hard compound tire that is a little slippery when cold. I push these HARD on corners, and they seem to respond better once I've done that a few times, but I can definitely only do it during warm, dry weather. Which, bruh, I live in Seattle.
Tried a few experiments during this time as well, and the one that I think panned out and I want to share is mostly a creature comfort one. I have one of the Diablo seats, and while I do love it, one of the things I noticed is if the bike gets rained on, I get a wet arse when I sit on it next, even if it's had time to dry. Now, I don't particularly like getting a wet arse, and if you have this problem on a bicycle, you put a shower cap on it. this seat is a bit too big for a shower cap, even a big one, so I went looking for one for people with afros (failed), and finally found that they make waterproof office chair covers and of course, they're also pretty cheap. So for ~$8 each, now whenever I park the bike - even under a rain cover - I slip this on just before I walk away. No more wet arse. Added bonus: during pollen season, no pollen arse either. Liked it so much I bought 3 of them.

Up next:
  • Going to do my yearly removal of the suspension, adding some anti seize protectant under the mounts of the suspension, and reinstallation, as well as the inspection of the bolts. Also the bike will likely need an oil change around that time, so that'll be up. Brakes aren't due for a while, and the wear and tear looks good.
  • Aside from that, preparing for a memorial day / mother's day sale, and getting ready to bulk order parts.
 

dmonkey

Well-known member
Joined
Jul 4, 2021
Messages
2,915
Location
🇺🇸
Nice tip on the rain cover. My aftermarket CT125 seat doesn't soak through the stitching, but the replacement OEM seat I bought for my CT110 does so I kept the plastic bag cover that it shipped with. Honda ship the CT125s with a similar plastic cover in the crate and I wonder if it's durable enough that someone might want their dealer to keep it for them after unboxing. I keep the cover on the CT110 seat when I'm not riding it to keep it clean and dry, and it's held up well despite feeling very light duty. There's an elastic band that holds it to the seat just like a shower cap.ct110_seat_plastic.jpg
 

bryanchurch06

Well-known member
Joined
Nov 4, 2022
Messages
1,008
I removed the rear wheel on the Dax, something ive done quite a few times on the trail with all my tubeless and tire experience since 2022 documented here on this forum. I was in a hurry and obviously over confident during reassemble because I swapped the collar spacer putting the small one on the sprocket side, surprisingly I was able to get the wheel back on by hammering the axle thru the brake assembly because the spacer was causing the rotor to bind and lock up the wheel. Now as soon as I needed force to move the axle I should have stopped and checked for issues but like I said familiarity with the task coupled with monumental ignorance I didn't listen to my own internal voice and continue to force the assembly. Lesson one if something that's always been easy now needs a hammer, stop and ask what's changed. So I initially thought my brake assembly was somehow screwed up and removed the tire with some effort and then stupidly repeated the process not once but two more times cursing honda, motorcycles and democrats, Republicans and anything else I could think of that may at some point have ruined my life, I'm an equal opportunity blame spreader btw. Finally realizing I had encountered some mysterious flaw in honda and totally forgetting I had the manual for the Dax i asked a neighbor for assistance who after helping me remove the tire from the locked caliper realized at the same time I finally did my spacers where swapped. So be careful on the routine simple tasks you do all the time, all it takes is a small washer or spacer to turn a 10 min job into 3 hrs of stubborn stupidity.
 

SneakyDingo

Well-known member
Joined
Aug 6, 2021
Messages
1,720
As a newbie,I’m wondering,what sign should I look for if I have to do a clutch adjustment .
Right now I have around 600 km.
😀

If you think you should do a clutch adjustment, just do the clutch adjustment. It's such a simple procedure that's so fast, it really honestly should be the first troubleshooting step everyone does with just about any troubleshooting for random clunks that are remotely connected to transmission.

Odometer: 20,000 mi

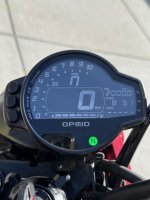
In other news... My baby turned 20,000 mi today on the way to work. As is customary, I took a photo at the nearest landmark to celebrate, which happened to be the Microsoft Visitor's center. In and out before someone called security, and I'm pretty sure someone called security.

I remember when it was only 10,000 mi old. 🥹

20250509_155032428_iOS (1).jpg 20250509_155017064_iOS (1).jpg

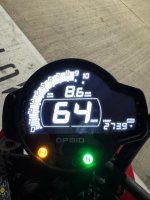
I also forgot to mention that earlier this week, I also set a new top speed personal record on the little Honda, the donkey pulling out all the stops and hitting 64 mph.

20250430_153057844_iOS.jpg
 
Top