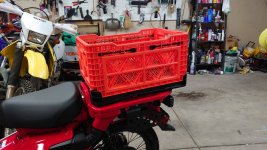
I keep forgetting to share an update: This worked great. Got my template from one of the numerous Amazon boxes we had lying around. It's working very well as a generalized platform to experiment on before going with a more permanent enclosed solution.
The full list I ended up using in order from rack upwards:
- Window Sealing tape to give a tiny bit of lift over rack touch points.
- KindGa Dish Drying Mat to protect the underside of the rack.
- M6 x 40mm bolts + 5/16 x 1 1/2" washers. (45mm bolts are too long; 1 1/4" flange washers are too narrow for this milk crate too)
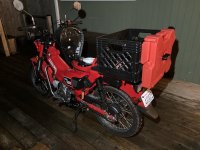
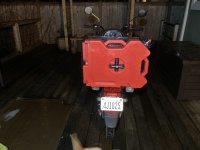
- JEZERO Milk Crate 13x11x19
- Some cargo netting I found at Harbor Freight that's slightly small.
This is a prototyping effort. I am using a milk crate to figure out how I use this and what I want to change or improve. E.g. I mounted it towards the back because I was unsure of how I wanted to mount a fuel can - between the rider and the crate, or behind the crate. Test fit by hooking the bolts through the holes (but not screwing it on) shown here. I'm leaning towards behind the crate.
The biggest downside so far has been the doggie backpack I use rests on the top, which transfers a noticeable amount of vibrations into the bag. The first time it happened I thought the dog was shaking from being on the motorcycle the first time (either from being upset or being cold) but it was just the bag touching the rack.
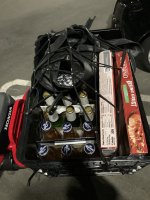
Generally speaking it's either way too small or way too big, but usually in the too big direction. The closest I've come to "perfection" was 6 wine bottles, 2x 6 packs of beer and two pizzas from the store on a recent grocery trip run, and just before I did said run, two DeWalt drills in their cases and some coffee beans from a friend. The DeWalt drills would definitely require some thinking if I didn't have the crate, but for grocery trip runs my cargo bicycle is a better choice in almost every situation.
I'm currently leaning in one of 4 options, in order.
- The original plan was to go with the Apache 4800 case (or equivalent) feeding SAE cabling in + SAE adapters inside the case using @G19Tony's approach; adding a top mounted Rotopax mount for a fuel can. I sacrifice generalized luggage and possibly some waterproofing, gain slightly secure powered storage. Mostly I am unsure of the wisdom of a half-full rotopax can lying flat on its side, exposed to sun in Washington / Oregon summer, doing 4000 ft of elevation change, which is about the worst case scenario I can imagine of my regular riding. I know side racks exist; of every 100 rides, the rotopax would only be joining me on 1, and I'm engineering/planning accordingly.
- Continue to use the "prototyping" milk crate as is, try pool noodles or rags + zip ties to dampen the vibration transfer to the doggo bag, with this being a more permanent than prototype option.
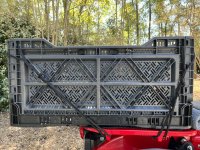
- Switching to the Big Ant crate @joseywales uses is only marginally larger in each dimension at 21.26"x14.17"x11.81" vs the 19"x13"x11. There's a math thing where a 14" pizza is 36% bigger than a 12" pizza because surface area is radius squared, and that applies here too. Despite having relatively small changes, the difference in volume between the two crates is 58.30L vs. 44.52L (+31%), and I also gain the ability to fold it flat so it doesn't vibrate the doggo backpack.
- Go all in on the Milwaukee Packout system. The most versatile, most heavy, and most expensive option. Crate when I need it, Secured box when I need it. I'm fat, so being concerned about weight is a serious concern. If I lost like 60 lbs this would be pretty viable. I keep this option on principle though, because this idea could also be realized by a milk crate or the 4800 case and using wingnuts, if I was ever to figure out how to get the bolts to thread upwards through the bottom instead of top-down, or generally just making the process of swapping cases less annoying.
 DSC_1399.JPG149.6 KB · Views: 225
 DSC_1400.JPG135.9 KB · Views: 222
 When I mounted an InstaCrate I taped some paper over the rack, punched a pen through the bolt holes, and then moved the paper over to the inside of the InstaCrate and drilled the holes. I later redid it because I found that the crate being flush with the bar at the front of the rear rack was a bit too close to my back and hit it on occasion. With my Givi top case setup I now have a backrest cushion so it's not a problem.
 .
.